Showing posts with label DIY. Show all posts

24 June, 2020

Cut It Out!

I have my work cut out for me, literally. I've done research on the history of that phrase and have found the most prevalent explanation as one that comes from the sixteenth century: "This phrase is supposedly a metaphorical allusion to the preparation of fabric to be worked on: once the shapes have been cut out, the tailor still has a lot of sewing to do, by hand in the past, before the cloth becomes a garment." This is certainly appropriate for today's post. I wrote most recently about going through the full-to-overflowing scrap basket to collect the batiks in there that were serviceable enough, size-wise, for making more masks. The requests for more have been steady. Today, Wednesday, has been deemed as mask-making day. I rescued enough fabric from the scraps to make thirteen! In the meantime, the rest of the scraps needed to be dealt with. Slowly, working my way through the heap, I pressed them and diligently cut them up into usable sizes. 
These scraps, leftover from various and assorted projects, were eventually transformed into this:
... and these squares, triangles and rectangles were all used to feed these...
...the bins that reside beneath my cutting table, Bonnie Hunter's Scrap User's System which has worked for me for many years! These, in turn, will be used to make more scrap quilts, and SEW it goes! 
After days spent cutting, the trash can looked like this. Yes, there are scraps too small to save! 😉
Meanwhile, out on the porch, Mr. Goodneedle had his work cut out for him too. He began re-slinging the dining chairs that have literally fallen apart after years of being out in the weather. The before and after, above, is night and day. We are both very pleased with the new, lighter (and sturdier!) look.

04 June, 2019

Watch Your Step

"So, we had this idea"; isn't that the first thing you usually hear when you're about to learn of someone's latest undertaking, their vision and all the details of what they endured and learned along the way?  This post is no exception! Like all great adventures, it started off innocently. We had "inherited" (translates to: found when cleaning out my MIL's house) a large number of hand-fabricated aluminum rings that my FIL had made for one of his long-ago ideas. We thought that they would be perfect forms from which to make stepping stones for the perennial garden. There are two sizes: 15" and 27". We kicked around some ideas for how to pattern them. I found a link to someone's blog on Pinterest where the maker had used a decorative rubber doormat to make some really pretty stones from concrete, she explained the process in detail and it seemed to be exactly the thing that we had in mind. We gathered the supplies: a doormat, Crisco, non-stick aerosol cooking spray and tons and tons of concrete mix! We were able to cut enough motifs from the original door mat to emboss four stones at a time (three small and one large). This cuts down on productivity and, considering that each "batch" takes twenty-four hours to dry, plus the fact that we figure we will require approximately fifty stones, our days are now consumed with stepping stone production! Every morning, at the crack of dawn (before it gets too hot), we've been up and mixing up wheelbarrow after wheelbarrow of concrete and making our "daily four". We're in a rhythm now. The following photos will serve chronicle the process.


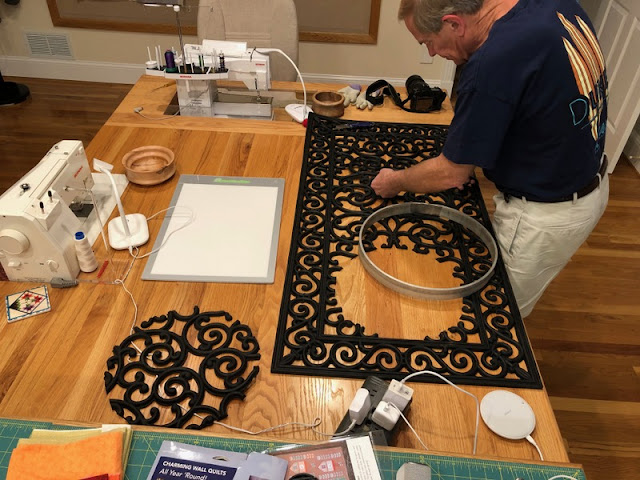
Inside each ring we laid out the motifs, initially, to make sure that they would fit properly for embossing. There is a layer of chicken wire inside each stone: concrete, wire, more concrete and then the rubber mat on top. 
Crucial for release is a liberal coating of non-stick cooking oil before placing in the form.
A days' full batch, drying in the sun. 

Close-up of a stone with the rubber form removed, next it will be gently tapped out of the ring form.
And so it goes, one day at a time and four more stones added for a path through the garden. 
There are four special stones for the grandchildren to discover placed randomly along the paths. 
We're all enjoying the garden project, even if we're not strolling through step by step; we have a quiet, tranquil place to rest and observe the birds and the emerging flowers at the end of each day.

Life is Good!


13 September, 2013

Fire Starters

 This post is a sort of a follow-up to the sawmill, logging post from yesterday. What to do with all of those leftover chunks, hunks, and slabs of wood that didn't make it into the board pile? Well, they're destined for the bonfire of course! I had seen a tutorial for making firestarters a while ago and I started making and collecting them, originally for my son who enjoys camping vacations, but he now has a portable propane campfire. Oh well, I kept on making them anyway... today my husband put a few to the test. I keep a clear plastic glass on top of the dryer with an empty toilet tissue tube standing in it (this containment cuts down on dust) into which I stuff all the dryer lint as it accumulates. You can fit a LOT of dryer lint in one tube, I pack it in firmly.


When the tube is full roll it up in an empty cereal or cracker box liner; 
twist the ends in opposite directions.
My husband sets the first one into action, it took a minute to catch but then it did a slow burn;
he had plenty of paper kindling too, which didn't hurt to get the fire roaring. I am thinking that the cereal and cracker box liners of old (wax paper) would be much better then this wierd plastic material used now, but it does burn. (Perhaps dipping this entire unit into a parrafin bath would improve the flammability level... however, that step's way too messy for me; I'll leave them as is.)

I'm not sure how much my homemade firestarters really helped, but I'll probably keep making and setting them aside, until someone tells me to stop; they're items that I would throw away anyway, and they look really cute all lined up in a zip-loc bag!   The bonfire has begun...
There's plenty of fuel, too, to keep it stoked... pass the marshmallows.

Life is Good!

03 July, 2013

Texture Wins (Maybe)!

Mr. Goodneedle and I decided we needed another DIY home improvement project ( after all, the outside logging/ sawing/ burning tornado clean-up can't last forever!). When we built our home twelve years ago we had our granite countertops installed but left the back walls up under the cabinets simply painted; the installers added a backsplash strip around all the edges. We have wanted to improve this area of the kitchen for quite some time. After much discussion, and endless deliberation, we've settled on the tile combination in the after photo, above. We looked at smoother glazed tiles but  we kept coming back to the texture of the natural stone every time. (For photo purposes these samples were taped up, the real deal will be grouted!) Okay, so making that decision was simple(!?!) enough; but, now, a real dilemma has presented itself. We have four areas in the kitchen where these backsplash strips run along the cabinetry.
Up until last evening we thought that these strips were caulked along the base but not attached to the cabinet walls, we were wrong. Now we're researching construction adhesive solvents, not sure if we can find anything that will successfully soften the glue (it's been curing for 12 years) and allow for a smooth release without damaging the cherry cabinetry underneath. Groan. Are there any DIY projects that don't come with their own set of built-in problems? If so, we've never found any! If worse comes to worse we can always run a strip of the accent base tiles along those areas; but, I'm hoping that we can avoid that as it would look so much better to stop short of that. I'm keeping my fingers crossed that we can come up with a smooth solution to this one and avoid any broken, splintered, wood surfaces; that conclusion would provide just a little bit too much texture for me! Wish us luck.
Life is Good!