Showing posts with label mistakes. Show all posts

25 February, 2020

Hitting the Road, and Hitting a WALL!

I'm packing today, and hitting the road tomorrow; yes, it's that time again! Are any of you going? I'm excited to reconnect with old friends, make new ones, see the always AWESOME quilt show and to visit the vendors mall. I'm taking a machine quilting class from Bethanne Nemesh on Friday.
This is the class that I've signed up for: "Fast to Fancy Freehand Feathers", isn't this photo tempting? We'll see how much I can learn in four hours! I'll give it my best, and I'll return with a full report. In the meantime, I've hit a wall with the Temecula Scavenger Hunt sew-along. If you've been following the last couple of posts from me you'll know that two of our grandchildren are currently visiting. In a slap-dash attempt to get ahead with this weeks' clue and get my quilt on schedule before I leave tomorrow, I quickly got all of the nine-patches stitched up and set yesterday afternoon. I thought I was ahead of the game; how clever of me!
From here, it was a hop, skip and a jump to bordering two sides and calling it a day. Think again!
 I pieced together the framed nine-patches with the spacer strips, as instructed. It did not fit-- at all!
With both ends pinned, I had a bit of excess in the center! Okay, this clearly wasn't working!
Back to square one. Here's the cautionary tale: ALWAYS square up, at every step! I did not!! The instructions were clear, the blocks should measure exactly 3 5/8" after adding the four side triangles. 
We won't even mention what mine were measuring! I was over-confident, I never even checked. 🙄
Check out the difference that going back to basics makes! I took each block apart. Just like I taught my granddaughter last week, I marked my seam lines and realigned my thinking to an ACCURATE 1/4" seam allowance! See what a difference it makes?
With pieced blocks this small, it makes a HUGE difference to be 100% accurate, and that's everything!  All that debris, in the lower part of the photo is what I trimmed away, block after block. I was truly giving my seam ripper a workout!
Good to go; at last!

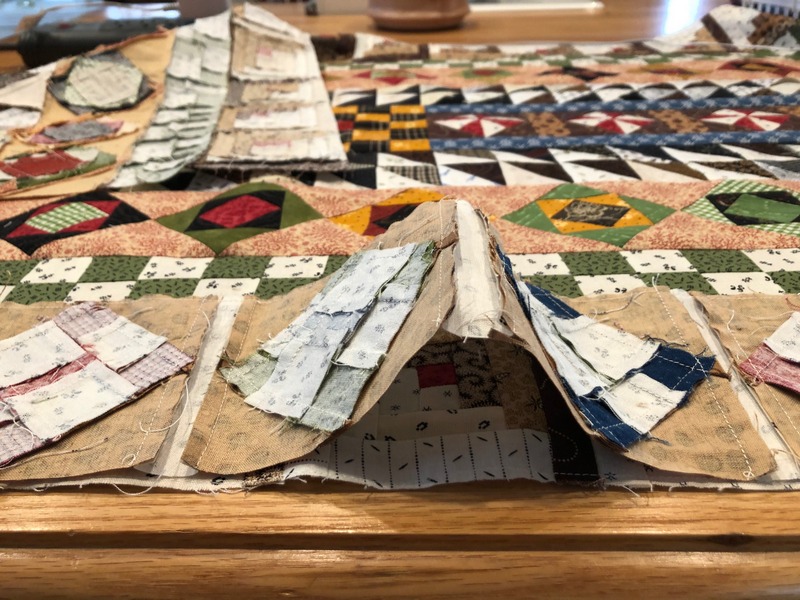
So, here's where I am right now. I laid out those re-sewn, and perfect, nine-patches alongside one edge and measured. It's all good; but then-- it's not! I'm unhappy with that light brown framing these blocks. I feel that there needs to be more contrast at this point, a much darker brown to echo back to the center rows. I have to continue taking these apart anyway,and so-- these framing triangles are going into the trash can and a darker, espresso brown is going to be reintroduced. This next step will have to wait until I return from MidAtlantic though; I need to finish packing, and I need to add a new seam ripper to my to the top of my shopping list! In the meantime, I'm going to pop up some popcorn and enjoy some after-school time with my grandchildren while I still can! 

I'll be back soon. 
Life is Good!

19 November, 2019

...Or So I Thought!

With a few of my quiltiest friends I had the opportunity to go on a retreat  the weekend before last; I was eagerly looking forward to this time away. I had accepted a challenge almost a year ago from Quiltkeemosabe and I anticipated this chance to meet that challenge and  achieve my goal of having a new table topper on our kitchen table by Christmas this year!
I had admired this pattern and Quiltkeemosabe gave it to me; the gauntlet had been thrown down. My fabrics were chosen and I was ready for the two-color version as shown on the pattern front.
Anticipating the greatest part of the challenge might be a color bleed I washed the red fabric seven times until Color Catchers faded to pale and scraps of red left overnight in water no longer leached any color. I was ready (or so I thought!). 
Before we left for our retreat destination I had precut all of the strips for the diamond-shaped piecing. One of the first things that I accomplished was piecing 32 diamond blocks as shown above. I stacked them neatly beside the sewing machine for pressing after we returned from dinner on Friday night. Little did I realize that I had misaligned almost every. single. one. of these units when pinning and, on further inspection that evening, I discovered that they needed to be un-sewn, realigned, pinned and stitched all over again. That was accomplished before bedtime (or so I thought!). After a good nights' rest and a bit of breakfast I was ready to begin piecing the large hexagon. Imagine my shock when I noticed that my units were all sewn with the dark (red) diamonds placed on the top and bottom instead of on the left and right! More un-sewing. More re-sewing. It was lunchtime before I was back at square one. 
I stitched like a fiend all afternoon and had the top together by dinnertime on Saturday. Or so I thought.! As you can see, above, two of the units were placed upside down within the pieced top!
Groan. The offending units were removed and replaced. Dinner time came and went.
Yes! Finally done!! I folded up the table topper and put it away in my travel bag, I was eager to try it out on our kitchen table for size once I returned home. It appeared to lie flat (or so I thought!).
A few puckers and wrinkles responded nicely to a "time out" after being misted, squared, and pinned to the carpet to dry undisturbed and, hopefully, flatter.
Finally-- ready for quilting! This challenge was WAY MORE than I ever imagined it would be! I suggested the following epitaph to Quiltkeemosabe, it certainly applies.  
All in all, the pattern is a good one; the directions are clear although maybe not written exactly the way that I think, intuitively. I wouldn't recommend a pattern such as this in a retreat setting where there's lots of other things going on around the room; at least not for me! In the meantime, while I worked on ONE project, the following was happening; Quiltkeemosabe single-handedly happened to finish SIX quilt tops herself!!
And me? I managed to sew a few tumbler strips together to clear my frustrations before I left on Sunday morning for home. But, yes; I rose to the challenge and WILL have a new table-topper on our table this Christmas! I ordered (or so I thought!) a very pretty Garnet-colored quilting thread for the finishing touch. I received only a portion of the order, the bobbins are back-ordered. Sigh. Patience is something that I have plenty of, and one more challenge that I can rise to. And sew I wait...

Life is Good!

Up next: Spreadsheet Required


10 June, 2018

Sew Berry Sweet

I had amassed a nice collection of various hexagons following our last block-of-the-month series. I knew how I wanted to set them together, and yet, they languished on the design wall. I had a stretch of a few days last week with nothing else on the calendar and began the process. I was excited about the prospects of this becoming a flimsy. 
Row by row I worked, since each block had been cut precisely using the Hex n More and the Sidekick rulers they fit together perfectly. I was on a roll. All of a sudden my roll was slowed; no, stalled... no, stopped altogether! This was my roadblock:
Where every other block measured 8.5", unfinished, this one measured a full 9"! What? How did this happen? I considered leaving it out and substituting another block. No, I loved this one just too much! I was stymied, where did I go wrong? I was left with no alternative but to take it apart, each segment of eight pieces each, and try to pinpoint my error. It didn't take long. 
My seam ripper got a workout. My Mom had gifted me with this a couple of months ago, a Clover retractable seam ripper.  She was cleaning out her sewing room and I became the lucky beneficiary of some really excellent notions. This little seam ripper worked extremely well, I highly recommend it, it fits nicely in the hand and has a sharp blade and won't poke when stashed in my portable sewing kit. Score!

So, here was the problem. I had completed each of the six triangle units but had failed to trim them down to size before assembling them into the block! Groan. I had been in too much of a hurry. See that little pile of trimmings above... something so small and seemingly insignificant was standing in my way! Once I got the problem identified and rectified it was full steam ahead! So, lesson learned. I know better.
One more product recommendation: (also a gift from my Mom) the Gypsy Pin Pal. It is adjustable to fit any wrist, it contains magnets and hold pins securely as I remove them when I stitch. This saves me numerous trips back and forth to my pin cushions or, even better, from retrieving dropped pins off the floor around the sewing chair. I love this clever invention. (I only recommend what works for me and am not promoting or receiving compensation!) If you are like me and have piles of pins placed on the flat surface around your sewing area after every row that's sewn you might want to look into this notion. It has not only made my life easier but my sewing space tidier-- win, win!
Speaking of the sewing chair-- look who waits for me between each trip to the ironing board as I attached the rows. My furry little companion. I sit on the front part of the chair, there's room for both of us!
"Sew Berry Sweet" ~ 76" X 76"
And finally, at long last, a flimsy. I had two yards of Cherrywood in a dark navy blue for the six inch outer borders all around to complete. Once I got that strawberry block fixed it was smooth sailing the rest of the way. I won't ever look at this quilt again without remembering. That pretty little strawberry block makes this almost-finish that much sweeter now, and contributed to this beauty's name!
Life is Good!

13 January, 2016

Froggin'...

 While on retreat this weekend I was able to complete the piecing on "Mountain Day". Or so I thought. Take a good look at this photo... look closely at the top row. Sigh. It needs to come off and be reattached, in an offset manner. Just when I thought I was making progress. 
This was the view from the back of the sewing machine after I took what I thought to be the final stitch; I was rejoicing then because I didn't run out of thread. There's no celebrating today. So, why is this post entitled Froggin'? Because I am talking like one today.
"rip-it, rip-it, rip-it"... and sew it goes.
Life is Good!

30 October, 2015

Bubble Trouble

This week it's all about pumpkins; the cookie learning curve continues, and if we don't get these out of the house, my latest creative venture could become a weighty matter!   I'm learning slowly...
You can see, in this "ghost" pumpkin and acorn close-up, that air bubbles are currently wreaking havoc with the finish on the icing. I have consulted many cookie blogs and websites and, I believe that I might know now how to rememdy that situation with a turkey lacer tool and an offset spatula, along with some less vigorous mixing on my part... we'll see.   Next week I'll work on ridding that nuisance along with acheiving some sort of icing consistency knowledge. However, on the up-side, how many mistakes can simply be eaten and forgotten? 
In the meantime I've got some sweet treats for neighbors and friends, I don't think a few boo-boos will matter to them.  And yes, in case you're wondering... I am still sewing! I hope to have a month long wrap-up post tomorrow.
Life is Good!

20 July, 2013

Flitting

Like this butterfly I've been flitting lately. From here to there, from thing to thing. It's all good. I've wedged in plenty of quilting time on Sundance today, you'll have to stay tuned for the reveal on that one, it's a surprise quilt and it's turning out nicely.

Another BOM has begun at my LQS and for some reason I told Quiltkeemosabe that I'd do BOTH colorways this time.. of course, why not, I don't have last year's done yet!

Little Miss Lucy Ann is getting a second pillowcase, as you can see; but, this isn't exactly the pillowcase I had planned. I had chosen a precious striped fabric to coordinate beautifully with Tinkerbell for the cuff. I embroidered her monogram in fuschia (to match the background of the main fabric) and attached it, carefully inserting the white piping accent at the same time, it looked great. I folded the unit lengthwise, right sides together, to stitch the side seam and I suddenly realized that the monogram was in the side FOLD! When I centered the cuff strip for embroidery placement I should have centered the midpoint of the front half, not the midpoint of the entire strip. Groan. The precious striped fabric was removed and replaced with the fabric shown above, from my stash. I think she'll like it anyway. I should be teaching graduate level courses in "Live and Learn", I'm certainly well qualified.
I stitched up a few burp cloth orders this week,
thankfully those went off without a hitch!
The kitchen is taking on a decidedly richer look with the new stone backsplash going up.  After we placed our order we were notified that the accent strip we had originally chosen was unavailable. Back we went, to the tile store, and after much deliberation, and many samples, we chose this random slate strip border. I love it combined with the bricks. Once this is "enhanced" (sealed) the colors will be richer and bring out the tones from the granite on the countertops and the cabinetry. Mr. Goodneedle makes an excellent tiler, I can't wait to see how it looks once it's sealed and grouted! Yes, many different things are competing for my attention these days; I'm still piecing away on my row-a-week "Light of Day" quilt and basically living in the studio. So, when you don't hear from me for a day or two (or three) just remember the butterfly and know that I'm here, staying busy. Summer will be over before we know it and my schedule will become much more regimented again; so, I'm flitting while I can, and enjoying every minute!
Life is Good!
 

10 November, 2010

Store Pick Up

I was out of my normal stomping grounds yesterday morning. I needed to drive to a nearby town and pick up my mother-in-law for Circle meeting at church. I decided to stop at the Walgreens near her home on my way to pick up some printed photos of the grandbabies. I ordered them through an online service from my laptop and checked the little box on the order form that reads: Store Pick Up. I received an E-mail confirmation that they were ready before I headed out. I ran another errand first and zipped into the pharmacy, I had plenty of time to spare. A thought crossed my mind as I made my way to the photo counter: "why don't all Walgreens set up their stores the same way"? I told the first employee I encountered what I was there to pick up; after some enthusiastic and dedicated searching in the photo department the clerk came up empty handed. I explained that I had received an E-mail and he kindly searched again. Nothing. He called another Walgreens nearby in case I had checked the wrong box on my order. Nope. I was reminded of a similar incident that happened two years ago, so, I gave him my blogger name; I had nothing to lose. He gave me a very confused look and simply suggested that I call back after I got home to supply him with the order and store number; he wrote down his name, the phone number and the extension on a small slip of paper. I agreed that I would do that and left the store. Later yesterday afternoon I dug out the paper, logged into my E-mail and called with the needed information; after reading through the message to the clerk I was met with momentary silence before being informed that I was calling CVS, NOT Walgreens! Walgreens is located across the street, no wonder the stores aren't set up the same way.

Life is Good!
Posted by Picasa