

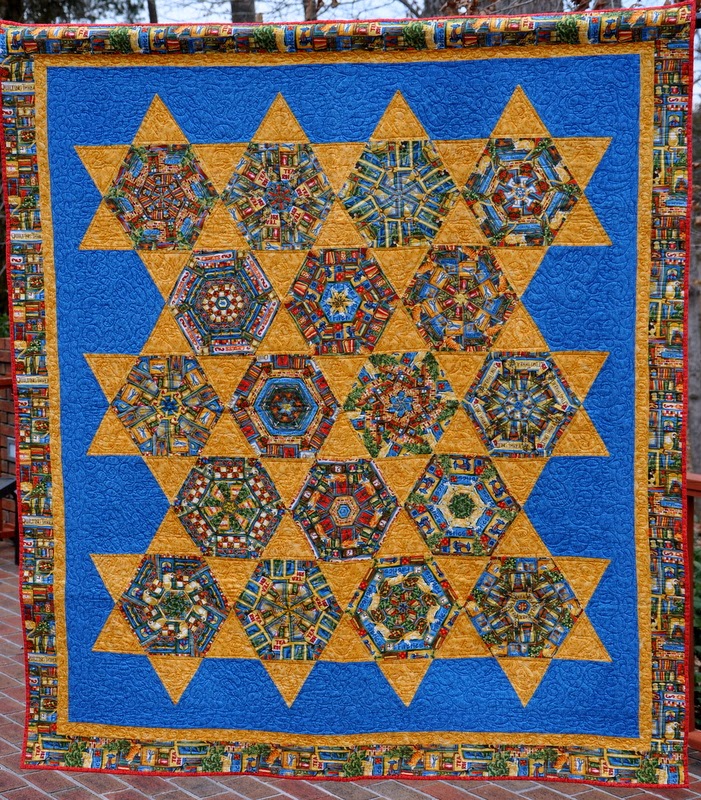
At first glance do all of the quilts pictured above look the same? It is the same quilt, but there are differences. I'm not a photographer but I take a lot of pictures. Just about every photo that you see on this blog is the result of a well planned and thought out photo "session" and, the photo that appears is likely the fourth, fifth or sixth shot of that same thing, the "delete" button is my friend! I always attempt to take the best photos that I can. What's my favorite subject? Well, naturally, it's my grandchildren... but, second to that it's quilts, of course! I took four different photos of the same quilt, in the same location, and am going to share the differences and some tips with you. For this illustration I am using an older Stack-n-Whack quilt, "Kaleidoscope Stars"; it just happened to be on top of the pile on the shelf. I used a camera on a tripod for all of these photographs, eliminating the worry about camera movement blurring a shot.
#1-- Not a bad picture (in my humble opinion); it was taken outside on a cloudy day; the color is a wee bit dark but close to accurate. I decided to take more photos the next day, when the sun returned. The angle at which this photo was taken doesn't allow for me to crop it squarely and show the entire border without including the background. I use Picasa as a photo editing tool, it's free to download and user-friendly.

#2-- I took this picture on the following day, in the morning sun. This photo has a few more glaring mistakes than #1. The distracting shadows that run lengthwise down the quilt are from the folds (if you have a choice store your quilts rolled or flat, not folded; this is why) and the angle of the light source (the sun). The quilt needs to be repositioned. The color here is washed out. This could be shot more directly for cropping purposes, better than #1 in that regard but still not great.

#3-- This photo was taken at the same time as #2; I slightly changed the angle of the quilt... now, the lengthwise shadows have all but disappeared, that's good; but the color is washed out even more. I did try to center the quilt perfectly for 'squaring up' when I crop the background and this one is better but there's still room for improvement. Slighty re-angling the quilt's position, once again, should help.

#4-- This is the best photo of the bunch, all things considered. I chose another angle for the quilt where the light source against the quilt's surface displayed a much more accurate color representation while still keeping the shadows to a minimum; here I did the best job of centering the focus as well. That long vertical fold is still evident, even after pressing this quilt with steam... this could be avoided with proper storage techniques; I'm learning. Notice here how the sides and bottom of the quilt are almost perfectly aligned with the edge of the photo? This is the shot I was looking for!

For a detail shot I like to aim my camera across the quilt from one side, this is a good way to zoom in on the quilting texture and view the quilt from another perspective which adds interest. Don't judge the quilting on this one, this was one of my first longarm quilting attempts, on Sundance, back in 2008. When you need that perfect quilt photograph: for entry into a show, for documentation to your quilt file, to share with friends and family, or for publication to your blog and/or social media; be prepared to take your time. Find the perfect unobstructed area with good light; make sure there's room for both the quilt and for you to move and postion both yourself and the camera directly in front of the subject. I upload the photos a few at a time, to my laptop, as I take them so that I can see them clearly for critiquing purposes and make the necessary adjustments before I knock down my set-up and put everything away. The extra time and effort will result in publication-worthy photos you can be proud of. Grab you camera and get busy... you too can get that best shot... every time!
Life is Good!


