Showing posts with label chain piecing. Show all posts

08 November, 2016

High Contrast Precision Check

These blocks represent a big shift for me in several ways: working in black and white and piecing in miniature, each block finishes to 4".  I started this project a year ago last summer, it is the Summer Sampler at Temecula Quilt Co., this online project offered four blocks a week over the summer months to completion.  I have chosen to follow my own schedule however (read between the lines: she couldn't keep up the pace!) and have resurrected this one from the bottom shelf of my carefully stashed UFO's. 
The high contrast of the chosen fabrics have really kept me on my toes, each teeny-tiny triangle has to be accurate and precise or it would stick out, visually, like a sore thumb. I laid out each block at the cutting table and carried them to the machine on a small cafeteria tray*, assuring each piece, in each row, would remain in order. I chain pieced the rows and "webbed" the block together by chain piecing each row to the next. I then pressed the seams open; doing that is very helpful to make sure that points are not cut off as the final row seams are stitched.
Look for the "v" that forms on the reverse side of the open seam 
and establish the next seam directly through the  "v" for a perfect point.
I will continue to make these blocks, all forty of them, as time allows. Challenge yourself on your next project to stitch as precisely as possible. Working small and in high contrast is completely unforgiving; for me, it has been a good way for me to tune up my skills, the results are worth it.
Life is Good!
On this, the eighth day of November, I give thanks for a 
creative outlet that continues to challenge and reward.

* I recently found the small cafeteria-style trays at a local hardware store. They are perfect for organizing and moving small pieces as well as for stacking and storing projects-in-progress.  

05 May, 2016

Long Time, L-O-N-G Quilt

I posted about this quilt a while ago. Already nineteen years old, this top was brought to the flimsy stage and loaded onto Snowbird yesterday. I chose to complete this one as a long twin, it measures 115" X 79.5". Loaded lengthwise onto the rails it is the longest quilt I have quilted-- ever!  I was getting the quilt ready when a glance out the window provided an unexpected, surprise treat.


Look who's back!
I have chosen to use a pantograph on this one: "Jessie's Swirls" with Hawaiian Blue thread. I like it. 
All of the precut colorful triangles are used up now, but look what remains yet: a boxful of background triangles! What to do? Will this project ever be done or simply continue to bear offspring?
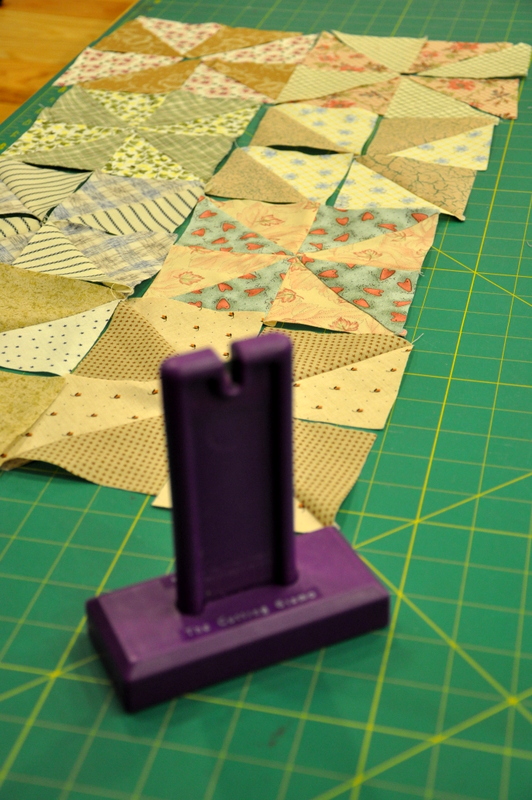
Yesterday I sat down and chain pieced a bunch of them into pairs. It was a good chance to give my newest notion a workout. I bought Gypsy Quilter's "Cutting Gizmo" a couple of months ago with the thought that I could talk Mr. Goodneedle into counter-sinking the base into a larger block of wood for stability. He looked it over and was impressed by the weight of the base and the design that allows easy replacement of the upper blade with a standard single edge razor blade. He suggested I use it first and decide if it needed further stabilization. I did and it doesn't. It's proven itself to be a handy assistant; it makes super-quick work of separating miles of chain piecing with no effort whatsoever!
And so... what will become of all those chain pieced triangles? More pinwheels of course. This time they will combine into a low volume, sash-less version and ultimately become a table topper for our kitchen. I can almost guarantee that this will be completed in less than nineteen years; hold me accountable!
Life is Good!

02 January, 2015

Chain Piecing For Accuracy

When I'm putting together most blocks based on rows ( I am using a nine patch here for demonstration purposes, but any row-based block can be put together similarly; four, nine or sixteen patch block) I usually put them together with the following chain piecing method. I will lay the block out in front of me with the squares or pieced units in their designated spots. I join the left row to the center row, (top to bottom) without cutting the thread between the rows.
Without clipping any threads the far right row (top to bottom) is placed,
right sides together, on top of the center row and stitched.

Stitching the second row together by chain piecing.

The block as it appears with the thread bridges in place; don't clip! Press the seam allowances in opposite directions: in this block I pressed away from the small green squares and toward the center on the top and bottom rows and away from the large center green square in that middle row. Now it's time to pin and stitch the the rows together; the opposing seams (with the thread bridges) will nestle in and align perfectly. Once upon a time I pieced a small wallhanging together in this manner, quilt blocks were chain pieced in vertical rows one after another with thread bridges holding the entire quilt top together before joining the horizontal rows; I did have to take special care that the blocks didn't twist when using this method. If you haven't chain pieced a block together before you may want to give it a try... it's a new year after all... time to try something different and fun; I believe you'll be happy with the end result!
VoilĂ !
Life is Good!