Life is Good!
Showing posts with label design. Show all posts
Showing posts with label design. Show all posts
18 June, 2018
Cart Before The Horse?
This is the first of twelve blocks-of-the-month that we will be doing at my LQS. Having just set all of those hexies together from the last BOM session it's all about moving forward. This time we're exploring blocks using Deb Tucker's Tucker Trimmer. If you've been a long-time reader you know that yours truly is a huge fan of everything Deb Tucker does and all of the Studio 180 tools. (The Tucker Trimmer is the original tool.) I chose the turquoise print, on the outside of this block, as my control fabric. Each block will contain that print with low-volume backgrounds that will change, block to block. I am staying with a monochromatic color scheme and already went ahead and designed my setting in EQ8. The Split-Rects borders on each block will alternate light/dark to add some interest and some movement. Is this a case of putting the cart before the horse? Maybe; after all, I have no idea what the blocks will be. But, I grabbed the reins anyway. We'll see where this goes, right now I am happy with the idea. (The pieced blocks inside the setting borders measure 12" square.)

28 July, 2014
"It's The Journey"
 |
| "It's The Journey" ~ 49" X 61" |
Life is Good!
25 May, 2014
Think Positive!
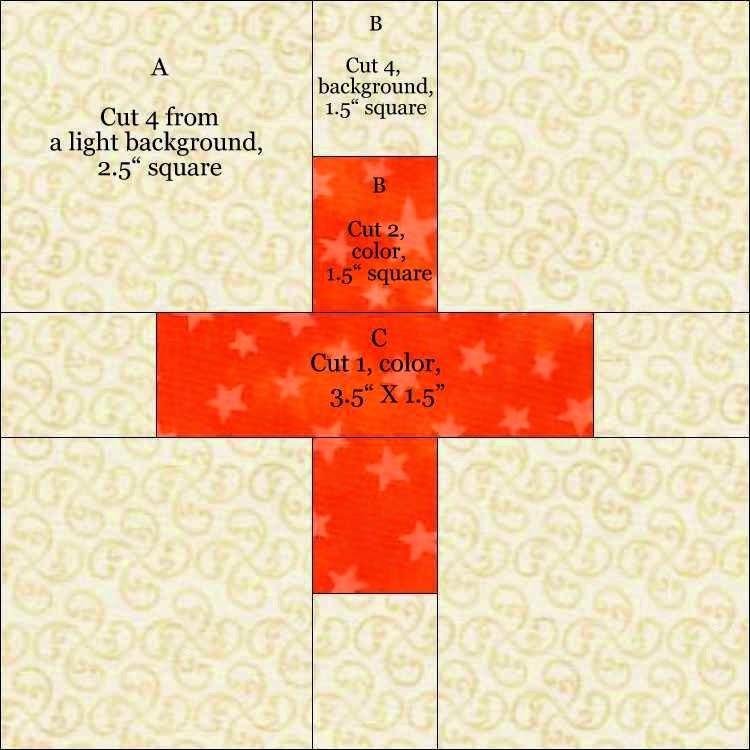
I've seen blocks that look like this around the blogs and on Pinterest boards lately, I find it very appealing. I went ahead and designed a version of my own in EQ7, one that looks more like a plus sign and am calling mine "Think Positive!" It's an easy block, here are the rotary cutting directions for a 5" (finished) block and a diagram for a finshed quilt layout, (below) set block to block, that could be either a lap robe/throw or a baby quilt. The size could always be increased by adding sashing strips between the blocks, if desired of making the block larger. I calculated the finished dimensions for mine based on a 2.5" border on all sides.
 |
| I gathered up a stack of charm squares and some 2.5" strips in happy colors. I will combine them with some soft, low volume background prints; I was eager to stitch up a test block... cute! |
28 April, 2014
Borders Galore!
Last Thursday our "Head For The Border" challenge group met to reveal their latest border additions. This last round saw the use of "square in a square" as the design element and the color purple. The results of each and every quilt are equally amazing and inspiring! For our next round we are each challenged to add a "border made of pieced blocks" and the color orange, based on a random selection.
23 March, 2014
Destination: Unknown
 |
| "Destination: Unknown" ~ 31" X 31" (so far). |
Life is Good!
24 January, 2014
I Need Your Help!
This is a follow up to my last post, the one where I admitted to being directionally challenged. Yesterday was the third meeting of our "Head For The Border" group where we enjoyed an inspirational show and tell as well as learned our next "assignment" based on the random choice of a design element and a color. The element selected from the envelope was squares. Easy enough, right? The color chosen: brown. Hmmm. Well, I decided that if I needed to add one more color I would add four; so, along with brown I am incorporating orange, blue and purple into this next round. Now, for a design plan. Squares, as is, were too boring. Squares set on point, however, intrigue me and continue the movement outward. I have placed three design possibilities up for consideration and for voting.

Let me know what you think: #1, #2, or #3.
#1 & #3 are almost identical, except for the corner blocks. (Pretend there's purple thrown in there too).
#2 is comprised of teeny, tiny squares, that border measures 1", finished.
Thanks, in advance, for your help... and your vote!
Life is Good!
Life is Good!
Subscribe to:
Posts (Atom)


