Showing posts with label quilt layout. Show all posts

20 October, 2020

What's New?

I'm piecing pumpkins and couldn't decide which background color to go with; tan or black. I've been weighing my options and have gone back and forth, I really liked them both, I couldn't decide. The setting will be sashed with that same background color, the pumpkins will float over that background. 
Here's the setting and the pattern name and source; it's a simple block and a cute, seasonal, quilt. Mr. Goodneedle asked where this pumpkin quilt was going to end up. I told him that it would eventually hang, as a wall quilt, out on the porch (although likely it will be a fall addition for next year). He suggested putting the blocks out there, against the brick wall for perspective. Brilliant!
That did it! Black background it is! 

In other news: meet Buddy! Our daughter and her family have adopted a new family member.
I'd say that he's settling in nicely-- to their home and into their hearts. 💗

What's new at your house this week?

Life is Good!

06 May, 2016

Now, That's Better!

121 blocks made from Rosemary Youngs':  The Quilt Block Bible
So, as you might imagine, it was a lot of work just putting all of these blocks up on the wall! My intention in getting them all up there was exactly as you might imagine: to view them all together. The effort paid off, there's reward in simply looking at them. That's when I noticed it-- there, smack dab in the center of the layout, the block named "Twin Sisters" just wasn't doing it for me, the contrast was too low. Can you find it? I remade it and replaced it in the arrangement. Now, that's better! It was time to start thinking about sashing, as I indicated last week. You all made marvelous suggestions and I am carefully considering my options. The photo below shows the layout with a dark indigo sashing mock-up as well as a red. Thoughts?

I'm going to leave the blocks up a while longer while I mull over the decision. Who knows, I may just remake another block or two before these are returned to their rightful places (for now) in the burgeoning binders! After all, I still have eighty-one more blocks to make. I need a larger wall!

Life is Good!

15 October, 2014

A "Soft" Quilt

Gregory's Soft Quilt ~ 47" X 67"
Gregory's birthday is coming up next month, he'll be four year old. I asked him what he wanted for his birthday and his immediate response was this: "I want a soft quilt, one like Mama's, but mine needs to have cowboys and trains and horses and tractors and race cars... oh, and barns too!" My daughter-in-law explained to me later that he was referring to her flannel quilt as the soft one. She received that quilt  from our Quilt Ministry when she was hospitalized with complications following Lynnleigh's birth. She went on to explain that Gregory would likely want his to be tied, not quilted, like hers; so that it would be soft and puffier. Okay, got it. But now, how to corral all those disparate prints into something that didn't look like a mish-mash? I dragged out an old pattern, the Quick Step Quilt * by Carol Britt. This top went together quickly today, I bordered it all around as a means of reining it in and I do think that it does look neat and orderly. Initially, I was really at a loss as to where to find all of these novelty prints in flannel... but wouldn't you know it, there's an online source: flannel world, and yes, they had everything Gregory's soft quilt called for! I washed and dried all the pieces before I set to cutting, each one came out of the dryer soft and fluffy; I was pleased with the quality.
Cowboys, trains, horses, tractors, race cars and barns, all together in one soft quilt; 
made-to-order for one very special little boy!
Here's the biggest surprise of all, the backing fabric is Minkee;
ramping up the soft factor to a whole new level! 


* I have used this pattern many times before, but it's been quite a few years; it is designed to be made in vertical columns, front, back and batting together. The units join together and actually quilt the piece at the same time. On this quilt, though, I was only interested in the layout for the front. I forgot all about the unusual assembly for this quilt and bought the fabric according to the yardage requirements on the pattern... plus the backing fabric. As a result I have enough of all the required flannel prints to make another, identical, quilt... just in case he loves this one to bits!

Life is Good!

17 September, 2014

Curves!

"Adding Curves" ~  to finish up at 74" square.

I've begun the border sections on his quilt and find the piecing process of slowly stitching around the gentle curves oddly relaxing! I've already admitted in my previous post that I love to challenge myself; that's the truth. The alternate Orange Peel setting blocks weren't too bad, as long as I took my time and was careful to watch out for any slack that might result in any volunteer pleats in fabric! But, in all honesty, I was dreading these double-petaled border sections that I had designed for myself, especially adding the "V" section to the unit. Much to my delight, I found that it wasn't too difficult after all! One thing that I have learned, though, (after doing the first two) is to overcut the outer edge of that "V" (in width) so that it can then be cleanly trimmed up at 1/4" beyond the petal points. The templates I've created are exact and, even though I paid close attention to cutting those outer edges on the straight grain so that there would be no "pull" lengthwise, there is still a bit of stress to that edge pulling up from the center as this piece is set in against the curves on either side. I have remedied that occurrence by cutting these pieces a wee bit more generously (in width only, and marking on the back side where the 1/4" would fall) along that edge to allow for clean up when the block unit is complete.  

I still haven't settled on the final placement of the pieced blocks, there has been much shuffling. I can use some help here if anyone would like to weigh in and suggest a possible block shift or rotation; I believe I'm at the point where I have gone block-blind on this one!

Life is Good!

25 May, 2014

Think Positive!


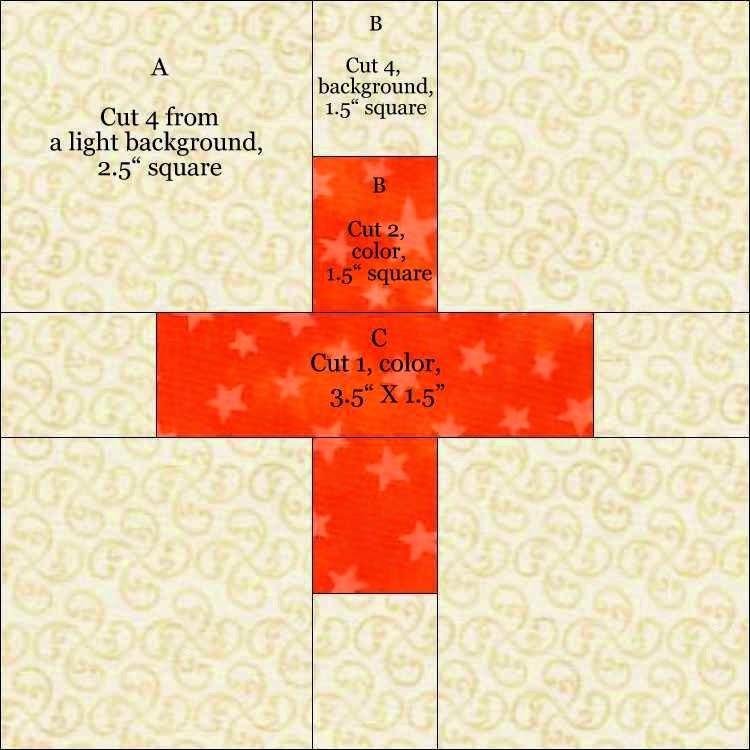
I've seen blocks that look like this around the blogs and on Pinterest boards lately, I find it very appealing.  I went ahead and designed a version of my own in EQ7, one that looks more like a plus sign and am calling mine "Think Positive!" It's an easy block, here are the rotary cutting directions for a 5" (finished) block and a diagram for a finshed quilt layout, (below) set block to block, that could be either a lap robe/throw or a baby quilt. The size could always be increased by adding sashing strips between the blocks, if desired of making the block larger. I calculated the finished dimensions for mine based on a 2.5" border on all sides.
I gathered up a stack of charm squares and some 2.5" strips in happy colors.
I will combine them with some soft, low volume background prints;
I was eager to stitch up a test block... cute!

Think Positive! ~ 45" X 55"

It's almost summer... and the livin' is easy; right? Why not take it easy and stitch up a cute little quilt for yourself or for future gift giving? You'll have this one done in no time... think positive!
Life is Good!