

Years ago I had a friend who would say she was running so fast she had to run in circles to keep from taking off. That's the way I have felt lately, simply trying to stay abreast of my day-to-day activities as well as catch up with all of those back-burnered projects from last year. The Quilty 365 is one of those, being sufficiently inspired to join the group, albeit late, it's one more commitment that I will honor for 2017; even if I have to swim hard, upstream, to get there. Finishing December's circles is a big hurdle along the way. I am hand appliquéing mine, I love the process. I did have an inquiry as to the method of preparation that I use to accomplish these. This post will attempt to explain; I am sure everyone has their own preferred method, this just happens to be mine. I have cut my background squares 4.5". I am using a 3.25" diameter circle from Karen Kay Buckley's Bigger Perfect Circles pack. These are heat-resistant mylar and, as the product name implies, PERFECT every. single. time. My preparation method is adapted from the instructions that come with the packaging of this product.

The first step is drawing around the circle onto the back of my chosen piece of fabric for that day.

I then cut out around the drawn outline, leaving approximately a 3/8" seam allowance.
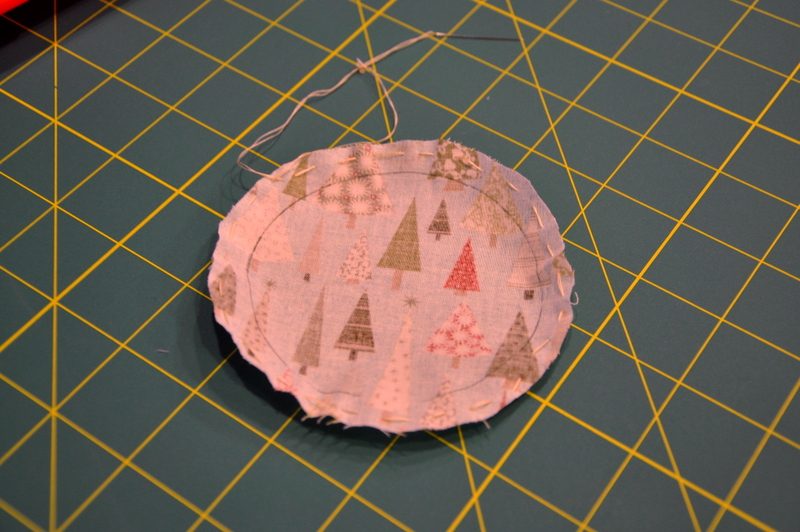
From there I place, by hand, a loose running stitch inside that seam allowance using a doubled thread.

Centering the mylar circle back inside the fabric, lining the edges with the drawn outline inside, I draw up the threads tightly against the edge of the Perfect Circle and knot the gathering threads.

From there I take the circle to a towel-covered (to protect your ironing surface) ironing board. I "paint" a small section of the circle edge with a small brush and spray starch which I have squirted into the cap for this purpose.

I then use my dry iron to apply heat to that section to dry it. From there I work my way, with the iron, around the entire circle. If any "points" occur from pleats, this is the time to correct that; using the tip of the iron against the dampened fabric edge, smooth the fabric back into position using the mylar circle as reinforcement. Hold the iron there a few seconds longer if need be. Once the circle has been starched, pressed and dried I flip it over and give it an additional press on the front before taking it to my work table where I let it "set" for an hour or so. I do each circle the same way. Don't skip the "setting" period. Believe me, that hour or more is a valuable investment in all your preparation time! You don't want a less than dry circle springing out of shape. Ask me how I know.

After the circles have "set" and are completely and totally dry, I snip the gathering threads on the back and gently slip out the mylar circle. These circles can be used over and over and over again!

The last step of prep before hand appliqué is to center the circle on the background. I measure each and every time. My circles need to sit 5/8" on each side from the cut background edge. I use a very small amount of washable glue from a gluestick to hold the circle in the center and hand baste along the edge into position. From this step I can stack up my blocks and place them next to my chair for the evening, with any matching thread colors that I need, where I will relax with hand work while watching TV. I hope you have found this helpful and will enjoy the process as much as I do. It's a good thing too; I have 314 more to go!
Life is Good!


11 comments:
Thank you for taking the time to show in pictures as well as words how you achieve your perfect circles. I will give this a try when I applique my next circles.
Wow, those are perfect! If I did applique, I would probably like this method. : )
Thank you so very much for this post and the pics with directions-I have done a little raw edge appliqué but gave up on this type. I love how perfect your circles are! I'm going to pin it so I can refer to it again.
Hugs,
Noreen
Thankyou for your comprehensive explanation, and I look forward to seeing it when you finish the remaining 300 plus circles!
Thank you for taking the time to take all these photos and post this tutorial.
Rondi
Yippee!! I've just started applique in the past year and already make my circles this way but never thought about how to get rid of those inevitable points! Thanks so much for taking time to show us your technique.
Your circles are so pretty and so perfect. I probably would use that method also, but I'm glad to learn about the "setting" period. It makes sense to do that. I wonder, has anyone mentioned using the reverse applique method? I'm thinking it would probably work well here, too.
Blessings on you and your sweet family!
Terrific process post. Happy circular stitching!
Your circles are so festive, pretty and perfect. I don't have the mylar circle, but do like that technique for quality work. I didn't know about the setting period, so thank you for the tutorial.
aha! so that's how you get such great looking circles! thanks for explaining your method.
I LOVE Karen K Buckley's circles but do not have that large size. Have the sets of the smaller ones and have used the heck outta them. Maybe have to look into the bigger ones. I've been very tempted by those daily circles. We'll see....
Post a Comment