Showing posts with label appliqué. Show all posts

18 February, 2021

The J-less Alphabet and Other Things

I'm still cross-stitching my winter evenings away. This little sampler was a big surprise; there's no letter "J" on the pattern. That sent me scrambling for answers. My friend, LP, informed me that there was no "J" street in Washington DC. "Back in the day", she said, "the letters "I" and "J" were so similar in form that Charles L'Enfant, the designer, refused to use the "J" for a street name to avoid confusion." This was news to me, further digging yielded the information that many samplers, dated well into the nineteenth century, were missing the "J", as this letter is a fairly young one, coming into usage only sometime after 1820. Live and learn! My plan for this little mini is to combine it with a school house quilt block or two (or three) and create a small pillow with it. 
We cleaned out the attic yesterday and found this gem of a board game! It appears to be brand new; the instruction sheet is dated 1987. I'm guessing that our children received this game as a gift from their grandmother; my MIL was wild about ALF! This is a true blast from the past. I couldn't discard it!
Our dinner selections have been upped a notch a few evenings a month. Our son and daughter in law gave us a free meal box coupon to "Every Plate" a while back. I've continued to subscribe, we average three meals a week every other week and it's really not a bad deal at all. Everything comes in the box, meat, fresh veggies, seasonings and a step-by-step recipe card. The meals are portioned perfectly so there's no leftovers or waste of any unique ingredients. This meal, above, is Herby Parmesan Crusted Chicken with garlic mashed potatoes and roasted zucchini. Every single selection that we've tried has been wonderful and we've sampled quite a few of their offerings. For us, it has gotten us out of the rut of the "same old thing" for dinners and challenged me with a few new and exciting ideas for food prep. I'm receiving no compensation from Every Plate, this is just a tried-and-true testimonial. If you're looking for something new and different you might want to give it a try. 
Remember that applique inspiration that hit me when I visited the National Quilt Museum recently? Well this old UFO is out of the box, blocks are completed and it's ready for quilting. I'm loving its folk-arty-ness and its simplicity. 
We were in the grips of an ice storm earlier today. Hopefully the worst has passed; as I type, the ice has dropped out of the trees now and the temperature has risen slightly above freezing. All the while I had my fingers crossed for the power to remain on~ it did!
Life is Good!

13 February, 2019

Pressing Matters

I have had an affection for irons and ironing my entire life; here's all the photographic proof you need!😉 I can't even calculate how many irons I have owned, and worn out, in the last six+ decades, there are that many. In the sewing room right now I have my large "workhorse" steam generator iron, a full-sized regular iron that I can carry into other rooms, a portable iron for travel, an old-fashioned dry iron without steam holes for fusing and two, small, Clover irons for hand appliqué work. 

In any quilt class, workshop or gathering of quilters the "steam or no steam?" question is always a topic open for discussion. I am a huge steam aficionado; the more the better! I like for the seams in my quilt blocks to lie super-flat; there's no such thing as too much steam for me. My only advice to quilters who can't decide if they are in the "steam" or "no steam" camp is to take precautions to avoid stretching; always "press" (up and down) and not "iron" (push back and forth) and to be extremely careful not to handle a pressed and steamed block too quickly, let it cool in place on the ironing board!

I knew that my old-trusty Rowenta "Expert" steam generator was on it's last leg, it had been over-heating and was slowly falling apart, I had owned, and loved, it for approximately five years. I adapted and made concessions for its quirks and foibles as I knew that this particular model was no longer being made. I was well aware that our relationship was coming to a close, it was just a matter of time. And then, one fateful day, when I picked it up it literally fell apart in my hand! That was it. 
Sadly, I was forced to search for a new model, the day that I had long been dreading was upon me. I knew that I wanted another steam generator but wasn't sure which one. The prices for irons such as these range all over the place; one can literally spend as much as one has! Cost was important factor in my decision, I had a list of requirements and researched for hours. In the meantime I used the Rowenta Power Glide 2 pictured above. It works well, but it just wasn't quite the same. I need steam! steam! steam! 
After all of my research and reading as many reviews as I could find, I took a deep breath and settled on the Rowenta "Perfect Steam" model. Clearly, as I learned from the reviews, spending an exorbitant amount guaranteed absolutely nothing. My choice was definitely, what I would consider to be, mid-range in the cost department. It arrived on the doorstep two days later. So far, so good. We are developing a relationship and I am finding new features to love. This model has a removable water tank for filling (yes!) and a nicely designed tapered tip that makes ironing around buttons effortless. Yes, I iron more than quilt blocks!
The day after our recent vacation ended I was back at it, catching up on laundry. I am happily ironing away again with ease. It takes a while to fall in love again, but we're getting there. I receive no compensation from Rowenta, my experiences with their products are mine alone; keep in mind that this isn't a review but, rather, my own personal opinion based on what I like. Speaking of that, I did do some ironing while we were on the cruise ship. I didn't t take my own travel iron along, but used the one in the laundry room that was conveniently located just across the hall from our room. Mr. Goodneedle asked how I liked that iron. My response: "meh". He just smiled. Yeah, I know-- I suppose that I am an iron snob, I can own that. How about you? What do you need in an iron?

Life is Good! 

05 November, 2018

This Little Light O' Mine...

This new, portable, light table is one of the most exciting and versatile tools to enter the sewing room in a long time. It is cordless, rechargeable, and super-lightweight. It is called the Cutterpillar Glow. I have had mine for a few months and have already used it a LOT!
For applique placement it is amazing! I used it over and over again to re-position the leaves on the border sections of my current applique project. Actually, I placed one border upside down over the light mat and placed it's opposing border strip on top of it to perfectly align the second border with the first. Score! The more that I use it the more uses I find for it! It has three light settings: low, medium and high.
Not only is its illumination valuable for applique but also for tracing embroidery designs onto linen.
But, maybe the most exciting feature of the Cutterpillar is the translucent cutting mat! Score!! If you have ever done any paper foundation piecing you know how crucial it is that you have a large enough piece underneath your foundation in the area that you're covering. Most of the time it's a guess before the piece is flipped over and you stitch (blindly) on the next line, hoping for the best; now you can see straight through, and cut right on the see-through surface! This tool eliminates that guesswork and allows you to align each piece, sized and placed properly, every time! I don't dread foundation piecing now-- I have always enjoyed the versatility of the method but shied away from its relative fussiness. No more. 

You might want to add a Cutterpillar to your Christmas list. You will love all its uses. Take a minute to watch the video in the hyperlink above. I am not associated with the company, nor do I receive any compensation for this endorsement, I am simply a fan of the product and believe that you will be too. 
This little light o' mine, I'm gonna let it shine... 
Oh, yeah!
Life is Good!


21 January, 2017

Running In Circles

Years ago I had a friend who would say she was running so fast she had to run in circles to keep from taking off. That's the way I have felt lately, simply trying to stay abreast of my day-to-day activities as well as catch up with all of those back-burnered projects from last year. The Quilty 365 is one of those, being sufficiently inspired to join the group, albeit late, it's one more commitment that I will honor for 2017; even if I have to swim hard, upstream, to get there. Finishing December's circles is a big hurdle along the way. I am hand appliquéing mine, I love the process. I did have an inquiry as to the method of preparation that I use to accomplish these. This post will attempt to explain; I am sure everyone has their own preferred method, this just happens to be mine. I have cut my background squares 4.5". I am using a 3.25" diameter circle from Karen Kay Buckley's Bigger Perfect Circles pack. These are heat-resistant mylar and, as the product name implies, PERFECT every. single. time. My preparation method is adapted from the instructions that come with the packaging of this product.
The first step is drawing around the circle onto the back of my chosen piece of fabric for that day.
I then cut out around the drawn outline, leaving approximately a 3/8" seam allowance.
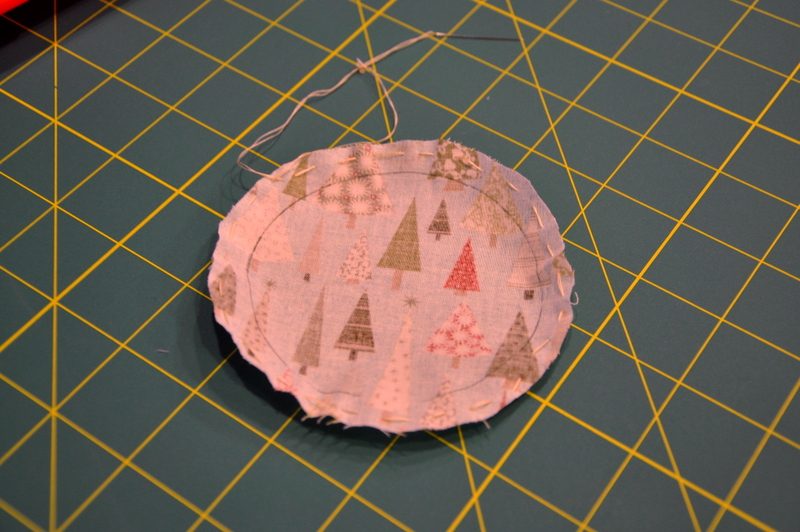
From there I place, by hand, a loose running stitch inside that seam allowance using a doubled thread.
Centering the mylar circle back inside the fabric, lining the edges with the drawn outline inside, I draw up the threads tightly against the edge of the Perfect Circle and knot the gathering threads. 
From there I take the circle to a towel-covered (to protect your ironing surface) ironing board. I "paint" a small section of the circle edge with a small brush and spray starch which I have squirted into the cap for this purpose.
I then use my dry iron to apply heat to that section to dry it. From there I work my way, with the iron, around the entire circle. If any "points" occur from pleats, this is the time to correct that; using the tip of the iron against the dampened fabric edge, smooth the fabric back into position using the mylar circle as reinforcement. Hold the iron there a few seconds longer if need be. Once the circle has been starched, pressed and dried I flip it over and give it an additional press on the front before taking it to my work table where I let it "set" for an hour or so. I do each circle the same way. Don't skip the "setting" period. Believe me, that hour or more is a valuable investment in all your preparation time! You don't want a less than dry circle springing out of shape. Ask me how I know. 
After the circles have "set" and are completely and totally dry, I snip the gathering threads on the back and gently slip out the mylar circle. These circles can be used over and over and over again!
The last step of prep before hand appliqué is to center the circle on the background. I measure each and every time. My circles need to sit 5/8" on each side from the cut background edge. I use a very small amount of washable glue from a gluestick to hold the circle in the center and hand baste along the edge into position. From this step I can stack up my blocks and place them next to my chair for the evening, with any matching thread colors that I need, where I will relax with hand work while watching TV. I hope you have found this helpful and will enjoy the process as much as I do. It's a good thing too; I have 314 more to go!
Life is Good!

10 January, 2017

Round After Relaxing Round

 Completed circles for November 2016 ~ (Nov. 10 - Nov. 30)
This is a catch-up post, literally and figuratively. I posted here last month about joining in the Quilty 365 challenge and my progress, or lack of it, in November. I began the challenge on November 10, 2016 and plan to continue through that date this year. Well, I decided to put myself back on track by doubling and tripling up on my appliqué circles to bring myself current. I am now preparing all the circles for the past month of December by going through my stash of collected (over the decades) Christmas fabrics and basting them into postion so that I can do the hand work in the evenings. It is truly relaxing.
Speaking of relaxing: these are some of the Christmas gifts that my daughter and I made together last month. We combined forces; she made up a few large batches of homemade bath salts and I made loads of faced washcloths. We bundled them up and traded with each other to make these cute gifts of relaxation for our friends: cute washcloths and bath salts given as sets for tranquil time-out.  Ahhhhh.
Life is Good!

25 July, 2016

A Barn Is Born

"Harvest Barn" ~ 21" X 34"

Welcome to the barn! At long last, the Harvest Barn is a reality. Hatched from my imagination, and sketched on paper back in 1993, this barn of my dreams exists today thanks to no-pattern construction outlined and followed, step by step, straight from Julie Sefton's Build-A-Barn book. Click here for the back-story, a previous post. You can have your own barn too: if you can dream it, you can build it! Let me share my progress, through photos, to give you a glimpse of the process. At the end of today's post you will have the opportunity to win a copy of Julie's fantastic Build-A-Barn book.
Working from my sketch, the first thing that I did was go to the stash and pull fabrics that I thought might work for the various elements: sky, ground, barn, windows, doors. I labeled my selections.
Following the directions in the book I made a section of scrappy ground strata; I wanted lots of oranges to depict an overall image of fall leaves strewn among an abundant pumpkin patch. From the ground a barn structure began to emerge. 
My original plan was to applique the "X" door braces but I changed my mind. Using Julie's method I inserted strips for the cross-timbering, I love the results; I also decided to add a spit-rail fence to the left using an easy step-by-step approach as outlined within the pages. 
From that point on it was all details. The originally selected sky fabric proved too vibrant, at least it did to my eye, (lower left in the photo above) but the reverse side of that same fabric worked perfectly (lower right). And so, the sky fabric was used on the WRONG SIDE; which seemed just right to me! I found a very old piece of fabric in the closet which contained enough pumpkins of exactly the correct size and scale (or so I thought) to pull the piece together. 
Using fusible web and sharp, tiny scissors I loaded the barn scene up with pumpkins galore; pinning the elements in place on the design wall before pressing them into place. I left it there a while to ponder and change things around as I saw fit. Mr. Goodneedle walked by and after only a quick glance suggested removing the three gargantuan pumpkins as well as taking everything away from the front of the barn doors. "No self-respecting farmer would ever pile things in front of a door that's being used." Right.
I shifted a few things around just so. Then, the machine applique began-- the tree, the sign, the weather vane and the bumper crop of pumpkins! Oh, I almost forgot-- a few bushels of apples too.
Harvest Barn: quilted and ready for binding. Can't you just hear the excited squeals of every preschooler who's ever visited a pumpkin patch in October?

As the binding was applied I was able to sit quietly with my barn and reflect. I am SEW excited to report that I couldn't have been one bit happier with the results of this project. Working from my own mind with the benefit of tried and true techniques from the book I was able to complete my very own twenty three year old dream barn in a way that far exceeded my wildest dream. Are you ready to Build-A Barn of your own?

Leave a comment on this blog post for a chance to be entered in a giveaway to win an autographed copy of Julie Sefton's book.  Be sure that as a commenter you're able to be reached via e-mail. If we can't contact you we won't know where to send the book. That would be sad. A winner will be selected on Saturday, July 30. If you're not the lucky recipient, fear not: Julie's book is available via the link above as well as bookstores and through your local quilt shop. If you can't find it, ask; they can get it for you!
Life is Good!

02 May, 2015

Crazy Little Conversations

Crazy Little Conversations In The Attic ~ 39" X 57" ~ 1998
Nancy, who blogs near Philadelphia, posted yesterday about some spider web blocks, entitling this clever entry: "Thinking of Wilbur".  I left a comment stating that I had a quilt with the words "Some Pig" quilted into a spiderweb. Her response: "I’d like to see that there Some Pig quilt of yours", prompted today's post.  This quilt is seventeen years old, it's a visual interpretation of word-play run amok! The title comes from CRAZY-patch construction of LITTLE CONVERSATION printS IN THE ATTIC windows setting.  Once the blocks were constructed I thought about literal conversations that might be had in an attic (reminiscent of the old $25,000 Pyramid game show... "things that might be said in an attic!") and added my own: "was I ever able to fit into this?", "what are we saving this for?", "you used to wear this?", "it has to be  up here somewhere", and "last one down turns out the light!" are all found in appliqued thought bubbles within the blocks.

Elaborating on the attic theme saw the raising of the "roof" to incorporate an actual attic space complete with a pair of mice; who happen to be playing, of course, (what else?) Cra-Z 8's!
I imagined there to be spiders in my attic, spiderweb quilting (by hand!) became the obvious choice. You can make out the words "some pig" just below the light bulb in this photo detail.
And there she is, the author of those words, Charlotte herself!
I'm grateful to Nancy for her recent thoughts of Wilbur, because of them (and her e-mail request) I was reunited with an old friend today... she's still looking pretty good after all these years and has reminded me of all the fun that quilting is, and always has been!

Life is Good!

28 July, 2014

"It's The Journey"

"It's The Journey" ~ 49" X 61"
After months of deliberation "It's The Journey" has become a full-fledged flimsy; and a life lesson! What started out as the ultimate LQS border challenge has resulted in a well defined wall hanging that has named itself... and taught me a lot along the way. Let me recap the process that brought this quilt top into existence. Back in January I posted here about the project and showed my progress to date. At that time I decided to name this one "The Long and Winding Road"; I was naive enough back then to think I knew, sort of, where this might be headed and that I might have a bit of control!  By the end of January, with the selection of the third border (squares) and color (brown) I was flummoxed and desperate for help; I posted that plea here. By now I was referring to this project as "Destination: Unknown" which it remained until only recently.  By early May I was propelling this along by changing things up, cutting corners, and adding appliqué. Eventually, the outer black seemed necessary to rein it all in and keep the center contained. The final design elements selected, at the end of May, were appliqué and the color(s) red, yellow and/or blue. I machine appliquéd the words, they became the best definition for what this entire challenge represented. Suddenly it all became crystal clear to this quiltmaker: it never had been about the destination at all, but rather, the journey.  Given the chance I'd set out all over again on another one; I'm grateful for the challenge.
Life is Good!