Showing posts with label homemade gifts. Show all posts

02 April, 2025

For the Love of Journaling

Do you keep a journal? I do, I have for years. Back at least twenty five years ago I read The Artist's Way by Julia Cameron and began the habit of "morning pages", although I don't subscribe to that discipline as strictly as I used to, I do still find that putting my thoughts down on paper first thing every morning helps me clear my mind and to organize my thoughts and plans. I have always used simple, garden variety notebooks, nothing fancy, to continue this habit. Sometime before Christmas last year I stumbled upon an Instagram post by Simply Eilene, a crafter who explained the simple way that she gathered fabric strips, leftover batting, a hair tie and a button to create lovely covers for dime store composition books. You know the style of books that I'm referring to.
The beauty of these is that the covers are reusable! Brilliant! I quickly pulled together the supplies (had everything on hand) and made a stack of these as Christmas gifts for friends.
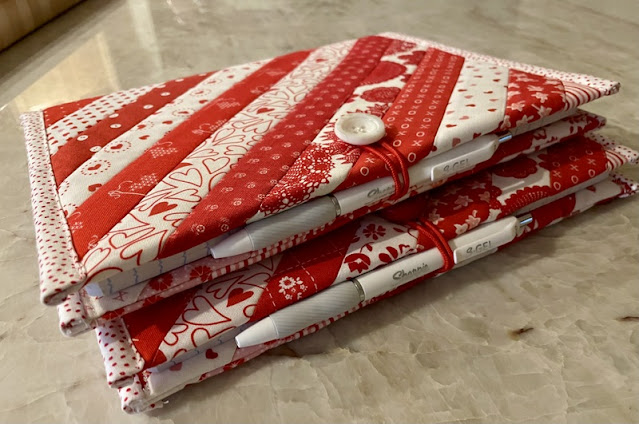
I added a pen and a few Christmas sweet treats, placed them in clear cellophane bags and sent them off. Time marched on over the last few months and I remembered, when I was writing in my dog-eared spiral notebook a few weeks ago, that I was planning on diving deep into that strips and strings bin and making more of these cute journal covers for others, plus one for myself! 😉
I created the dark red one at the top of this post and these over the course of the next few days, they've all been gifted. The recipients seemed to love them! But, I still didn't have one for myself.
Until yesterday. 🍓 Using the stitch and flip method and a 45° drawn line onto a scrap of batting I sewed strip after strip until I'd covered the base. I trimmed it up, cut 4" off one side (to add the hair tie into a seam) and then machine stitched binding on each end using a contrasting fabric.
At this point I laid a composition book open on top of the backside of the cover and folded those ends in and over for size. I attached a few Wonder Clips to hold the ends and added the top and bottom binding in the same manner as the short ends, stitching it all into place by machine. 
At this point I added my notebook by slipping the covers into the pockets on each side, closed it up and pulled the elastic tie onto the front to measure for the button placement. 
Voilà!  
My own journal cover sewn from strawberry prints that I've been hoarding. Once I began making these and had pulled all the necessary supplies onto the worktable it took me about an hour start to finish for each one. The only hand sewing involved is adding the button. If you're looking for a quick and easy gift you might want to consider this idea. I've made a few of these for children and have placed an unruled notebook inside so that they can illustrate their pages unhindered by lines. In fact, I'm going to switch out my new cover to an unruled notebook as doodling and drawing can only add to the depth of my morning pages; these can also be utilized as project books and/or planners; my journals also have endless "to do" lists. My new cutie-patootie notebook won't be gathering dust, rest assured. 
Life is Good!

27 December, 2019

Post-Christmas Report

All of the super-secret stitching that went on around here before Christmas can finally be revealed. The family in the Capital City (3 out of 4 of them) wanted weighted blankets this year. In fact, Mason has been asking for one for MONTHS! He was very specific about what he wanted: snow camo (I didn't even know that this was a thing until I looked it up!), and he wanted his to be twin-sized (12 lbs.!!!😲). I suggested that this might be too big and heavy for him, but "no"; it's what he had his heart set on. In the meantime, Lucy Ann told me that she wanted a throw size (the term "throw" here is laughable, these are substantial items(!), even this smaller size weighs 6 lbs.)  "with hedgehogs". Our daughter seemed interested in receiving one too, I decided to make hers in the smaller size as well. I set to work from there researching weighted inserts. I found these, from Poly Fil.
Suffice it to say, they were a BIG hit! These inserts came with complete instructions for yardage requirements and easy-to-follow directions for making the covers. I backed them with coordinating solid-color fleece.

The above photos reflect their happy reactions to their gifts. We spent Christmas Eve day there and returned home for Christmas morning at our son and daughter-in-law's home. What fun and excitement there was there!
Gregory was quite enthused about a Cribbage board that Santa put in his Christmas stocking.
And Lynnleigh was thrilled with a violin set for her American Girl doll!
At the eleventh hour I decided that we needed something special for the cash gifts. Stockings were created; they doubled as ornaments for the tree after they were opened. Everyone seemed to enjoy them. If anyone is interested in this easy-peasy lined stocking/ornament let me know and I will send you the instructions and the diagram that I came up with; please make sure that your commenting profile is attached to an email address so that I can get it to you! The little stocking measures approx. 4.75" H X 4" across. 
I made a few "Gadget Cushions" to send to my friends for Christmas. Here's my prototype, above. These are handy for parking devices, they're filled with crushed walnut shells, giving them some heft and stability. They can also double as a pincushion if it's parked as a phone holder by the machine while sewing. (Ask me how I know!) They have a couple of loops attached to hold a stylus, pencil, seam ripper, or scissors. I believe I will be making up a few more for other rooms in the house. The patterns for these (link in text, above) are printed right onto the fusible interfacing that lines each cushion. That extra reinforcement helps to ensure that the crushed walnut shells won't migrate. Win-win! 

Santa brought a special surprise for Hannes. He absolutely loves curling up in his new bed! 
Here he is, enjoying it fully, settled in for a long winter's nap!
And, just like that, another Christmas has come and gone; it's a wrap!

Life is Good!

Up next: Looking Ahead

02 August, 2018

Birthdays Abound!

A decade and a week or so have passed since the tiny baby, the one that made me a Nana, 
burst onto the scene.  Happy Birthday, Mason! 
Four days after her son celebrates his birthday our daughter's birthday rolls around. We drove to the Capital City late last week to take her and her family out to lunch on her big day. I didn't get any pictures of the festivities but had taken a shot of this "All Aboard" bag that I made for her from a By Annie pattern. I believe she liked it. It really was easy to construct; the directions, as always, were clear and simple to follow. There are two mesh pockets on the inside to organize the contents. This one is the medium sized bag; the pattern contains instructions for three sizes: small, medium and large.
And last, but certainly not by any means least-- our furry little buddy, Hannes, observed his fourteenth birthday yesterday! He was more than happy to pose for the occasion; but, he wonders- where's the cake?
Life is GRAND!

10 January, 2017

Round After Relaxing Round

 Completed circles for November 2016 ~ (Nov. 10 - Nov. 30)
This is a catch-up post, literally and figuratively. I posted here last month about joining in the Quilty 365 challenge and my progress, or lack of it, in November. I began the challenge on November 10, 2016 and plan to continue through that date this year. Well, I decided to put myself back on track by doubling and tripling up on my appliqué circles to bring myself current. I am now preparing all the circles for the past month of December by going through my stash of collected (over the decades) Christmas fabrics and basting them into postion so that I can do the hand work in the evenings. It is truly relaxing.
Speaking of relaxing: these are some of the Christmas gifts that my daughter and I made together last month. We combined forces; she made up a few large batches of homemade bath salts and I made loads of faced washcloths. We bundled them up and traded with each other to make these cute gifts of relaxation for our friends: cute washcloths and bath salts given as sets for tranquil time-out.  Ahhhhh.
Life is Good!

14 November, 2013

It's The Pits!

I got a bright and early start this morning, making boo-boo packs to keep in the freezer, small soothers for those bumps and scrapes that occur all too often to the knees and elbows of our littlest loved ones. Using upholstery sample swatches and those cherry pits* (could this be the ultimate recycling project?) mentioned last week, I had twelve made up before nine o'clock! These are small; they measure up at 3.5" X 4.5", finished, and are just the right size for little hands to hold. I constructed liners for each one, for durablitiy, using up scrap fabric from the stash closet. After the boo-boo packs were done I began on the heating pads. I made them 8" X 8" and filled the first one until it felt "just right". I weighed it on a kitchen scale; the remaining pads were weighed for consistency; I ended up with ten heating pads and two slightly larger (than the above mentioned size) boo-boo packs when the day was done. These larger ones I finished with a lapped closure on the back so that the pit bag can be removed and the cover washed. The heating pads can be warmed in the microwave (for a minute and a half) and will deliver a warm hug (and a delightful cherry aroma) as the cold winter days, and nights, set in. I used about two thirds of the pits today and plan to make a few larger heating pads to keep here at home. The scent of the cherry orchard lingers. Mmmmm...
It was a productive day, pits and all...
Life is Good!
*If you live in the Michigan area you might be able to find these 
cleaned cherry pits locally and save on shipping~ lucky you!