Showing posts with label LQS. Show all posts

13 September, 2023

I Sewed!

Yes, I did it; I sat down at the sewing machine this weekend and actually sewed! This is the sum total of two days' work, not much in the grand scheme, but it's HUGE after these last two weeks of being sidelined! Yay!! These were already precut and labeled before my little trip onto the brick sidewalk, if they hadn't been I'm not sure I could've gotten this far. I'm unable to use the rotary cutter just yet. 
The pumpkin blocks will ultimately become the borders for this table topper, it was a kit. I committed to three kits from my LQS last year (who offered the kit of the month program); October, November and December. Stay tuned for more, but be patient. My Dad has always said, in situations such as these, "don't hang by your thumbs waiting"! That most certainly applies here.
This is the current situation here, Mr. G is in the kitchen installing backsplash currently (out of view, to the right); Augie is sitting in the Studio (pantry is in view, straight ahead). I'm ironing and he wants to be part of what we're BOTH involved in. Such a loyal little friend. ๐Ÿ’—
So, for those of you who've been following this cracked wrist saga; you might recall that I tripped over the garden hose, that was my fateful step. Unbeknownst to me, Mr. G removed that clunky big hose that was my downfall and replaced it with a Flexi-hose. I stepped off from the side porch the other day, taking Augie out, saw this and almost had a heart attack! For all in the world, to me, it looked like a coiled black snake! I grabbed up the dog, and jumped back; it's lucky I didn't trip, fall and break the other wrist. Fear not, my BP has returned to normal.
Life is Good!


18 October, 2022

Trying It On For Size...

It's officially fall; the leaves are turning color and falling with a fury, the big yellow school buses are slowing down traffic twice a day again and it's time for new classes. I haven't been out raking yet and I do my best to avoid running errands when school is starting or dismissing but I am enrolled in new classes, two to be exact; the new Blocks-of-the Month at our LQS. I haven't quilted up the two flimsies that I got together over the summer from last year's offerings but I'm as eager as ever to get started on the new ones! Another "school year" begins! The classes are both samplers, completely different patterns and techniques. This is block one from the first class. It went together so well that I made three! Yes, three. All the same except for the size. The pattern calls for a fifteen inch block; I wondered, though, how would it look as a ten inch block? Hmmm... I liked it. But then, if ten inch was good, how about five inches? Even better! I love it! 
I'm not sure yet how I will proceed as the year goes on, if I'll continue with multiple sizes or not, but this really was fun to try! The second Block-of-the-Month class begins tomorrow. I'm excited to begin. 

Thank you all for your kind words and sympathetic comments following Hannes' passing. It's been tough each and every day. Slowly, the lasting memories of funny moments and happy times with him are being recalled and do help to ease the hurt in our hearts, the one place where he'll always live on. We miss his physical presence, I still find myself getting up to let him out or thinking about getting his dinner ready; daily life has a new routine now, it's all taking some getting used to.  We were lucky, he was a great dog who was dearly loved, a feeling that was reciprocated for over eighteen years. ๐Ÿ’—

Life is Good!
                                       

03 August, 2021

Fast-Forward Fourteen

It only took FOURTEEN years for these blocks to make it to the finished flimsy stage! Yep, I know that's how long it’s been because I looked it up; this was a block of the month project that occurred in 2007! ๐Ÿ˜ฒ I have a large plastic bin in the bottom of the stash closet, it contains more "antique" treasures too! Last week I dragged that bin out into the light of day and emptied its contents onto my sewing table. 
Here is what was awaiting me as I pawed through, what seemed like, years of my quilting life; six sets of unset blocks from BOM programs at my local quilt shop. The quilt pictured on top from 2007 wasn't the only one that I did blocks for that year, oh no; I also did what was known as the "traditional colorway" and piled those blocks up too! They're in the #3 pile above; this BOM was the "Hidden Stars Sampler", done with templates by Marti Michell, I have all the matching setting fabric neatly bundled together with the finished blocks which certainly makes bringing them to that all-important "flimsy" stage that much easier. Group #1, above, was a program entitled "Creative Options"; those are relative newcomers to the bin, they're from 2015, only six years old. The black/bright blocks in stack #4 are from 2011; I don't have any setting fabric from those but I do have the fabric and pattern for two additional blocks as I'd only completed ten. Why? Who knows, that was ten years ago! The mounds of blocks numbered #2 and #5 are harder to put exact dates to, they're VERY old; at least fifteen years have passed since I started those. The mound of fabric and blocks identified as #6 are red and white "trial" blocks from other projects, they've been collected over the years as I've experimented with  new patterns. So, here's the plan: none of them are going back into the shadows of the closet! The bin is now empty and it will remain that way. These UFO's have seen the light (as have their maker) and each is destined to make it into the "finished" column ASAP. From there; who knows, one step at a time. They've been sitting this long, clearly there's no identified destination. 
Progress report: "Summer Stars" has been loaded onto the rails for quilting. Unlike fine wine, flimsies don't necessarily improve with age; but, what does increase their value is to be quilted, bound and done!  And sew it goes... "instant" vintage! ๐Ÿ˜‰ 

Life is Good!
Finished is GREAT!!

27 August, 2020

From Bits and Pieces

I was cleaning out and tidying up the other day and I ran across a bin filled with pieced four inch sub-units from a multi-session course that I attended a few years back, offered at my LQS. The course was "Tucker University" and we used  Studio 180 tools and technique sheets to make basic units: half square triangles, quarter square triangles, combination units, shaded four patches, square in a square, flying geese, high-low blocks, sidekick blocks, corner beams, little houses and pickets. At the time I chose the focus fabric (dk. blue multi print) and pulled the coordinating scraps from the stash for a controlled (sort of) palette. I blogged about it here almost three years ago. I never stitched any of the blocks together, simply bagged the sub-units together and put them, and the background and focus fabrics, together in the bin. I've had SO MUCH FUN this week arranging them, changing them, taking them apart, rearranging the components and putting them back together again on the design wall-- like quilter's building blocks. The beauty of using these tools is the precision achieved after the trim down step; everything fits together perfectly, they're completely interchangeable! I was surprised (and tickled) to realize that I had enough pieces to put together an entire sampler-style quilt top! ๐Ÿ˜ฒ I'll sash it up with the focus fabric and put the leftover pieces (yes, this was a loaves and fishes bin!) into the scrap basket to run through the die cutter. All this time at home is yielding lots of happy benefits. What's lurking in your closets?

Life is Good!

24 March, 2020

Gotcha Covered

Just like everyone else in world, I am sewing masks; so much has changed in the past week. A friend told me that this is the WW2 equivalent of rolling bandages for the war effort, we're all fighting a vastly different type of war this time. I stitched masks until I ran out of elastic and then took to sewing fabric ties. The pattern that I used was this one, distributed by my LQS at the request of one of the employees, her husband is a Pulmonologist at a local hospital in desperate need, where these masks will be delivered*.  I've been finishing up and doing other things too while staying at home (are these the days for which we've been stockpiling supplies and fabric?) and hope to start posting some cheer-filled, short posts on a daily basis beginning tomorrow. Please stay safe, be healthy and wash your hands. ๐Ÿงผ
Life is Good!

Up next: Berry Good

* Disclaimer: As Annie so perfectly advises in the comment below, : "they have limitations as a viral barrier. Medical personnel know this, but if you’re giving them to untrained people, make sure you let the wearer know they won’t offer the protection they get from commercial ones (which are unavailable)". As far as I understand  it, the recipients of these homemade masks plan to use them in combination with other viral barriers in the hospital setting.

06 February, 2020

Getting it Together

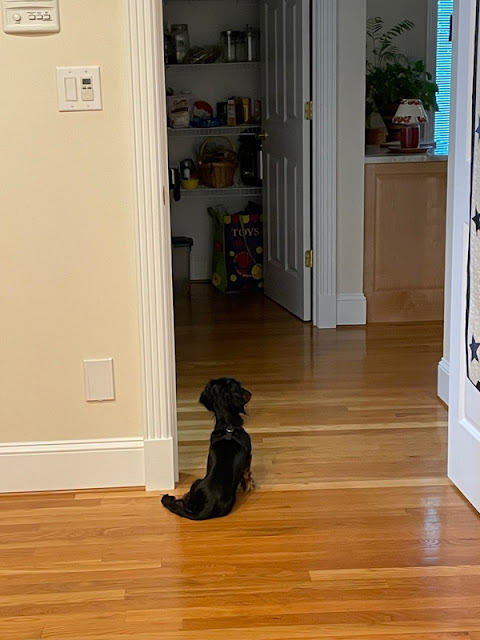
Class sample: Four prequited blocks joined together with lattice strips. 
I can become a procrastinator if the conditions are right; this is not something that I am proud to admit. So, a year or so ago, a dear friend presented me with a large bag of hand quilted sampler blocks that her mother had made back in the 1980s. She asked if I could assemble them for her to present to her almost 92 year old mother. I smiled and agreed. Honestly, I wan't too excited about the task; truth be told, I wasn't sure, at all, how to proceed. I made an initial assessment of the bag's contents; the blocks were randomly stacked inside along with yards and yards of additional fabric. I set the bag out in plain sight-- for a while. Then, the bag moved to a closet; and, finally, to the deep and dark recesses of that space. Out of sight, out of mind, right? Not exactly, I knew they were in there and the guilt of not tackling the project grew exponentially. Quiltkeemosabe told me that she was considering teaching a class at our LQS, a Quilt as You Go class. This class was tailored to those who might want to quilt their blocks individually on their domestic machines, the class would demonstrate how to join quilted blocks. Yes, I told her, I NEED that class!! Last Saturday the class took place, it was exactly the jump-start that I needed! As students we were shown a method of joining quilted blocks with thin lattice strips, I was intrigued by the technique; the lattice strips "joins" become a design element both front and back.
This is the back of the class sample shown above, the finished strips on the front measure 1/2" and, on the back they measure 3/4". There is hand finishing on one side of the strips on the back. My examples show contrasting fabric but, naturally, this could also be done with matching fabric that would blend and be hardly noticeable. 
Energized to begin, I pulled out the decades old sampler blocks, weeded through them, and after a few phone consults with the quiltmaker's daughter we agreed on this lay out. 
The first two, joined with the newly-learned skill. I was off and running. 
Before dinner last evening the top half of the quilt was joined together! Like all tasks that are put off; once begun, this seemed much simpler and faster than I had heaped this up in my mind to be. I am happy with the way this is coming together, even more so, it's a relief to know that soon this will warm the body and soul of the dear lady who made these blocks all those years ago. 

What are you putting off today?

Life is Good!
Up next: "Flower Power"

27 November, 2019

There's A Simpler Way!

I pieced these blocks eight and a half years ago. I believe the reason that I abandoned the project was because I drafted templates for those setting corners and it wasn't the easiest task to piece these. The results were good, but, apparently, I wearied from the task.
My inspiration for this project came from this antique quilt that I recall seeing at a Guild show and tell; I was smitten. I came home and researched the block name, which I found to be "Texas Tears" and posted about my progress here; I even offered the pattern that I had drafted. I'm unsure at what point I back-burnered these and moved on. Fast forward to today. I was working on this month's block of the month from my LQS, we are using Studio 180's "V-Block" tool now. Something clicked as I prepared the block-- "I wonder", I thought, as I dug for those long-ago shelved blocks.
I stitched up this pair using the tool and rotary cutting-- no templates, no set-in seams.
Here's a side-by-side comparison. Yes, the block on the right has an extra background seam. Will this matter in the whole scheme of things? Not to me! I have only a few blocks shy of enough to make a good-sized quilt. I know how I will piece those remaining blocks too, these's a simpler way! I think I might know where the "tears" in the Texas Tears blocks came from! Stay tuned for more on this project. 
I had a few donation quilts to finish on a deadline last week. Quiltkeemosabe suggested machining the binding, avoiding the time-consuming hand finishing. I'm glad she spoke up-- yep, there IS a simpler (and quicker) way!
Wrapped and ready for donating; and, ahead of schedule! 
Life's short, make it as simple as you can.
Life is Good!

Up next: Happy Thanksgiving!

14 October, 2019

Quilt Blocks to Placemats

It's a short jump from quilt blocks to placemats; and much more user-friendly than having quilt blocks stack up in the stash closet! I chose the tiny gray dot background for this years' BOM classes at my LQS; we're using Studio 180 tools this time: Wing Clipper, V-Block and Corner Beam; I love the sessions and the techniques but quickly realized that I can only make SO MANY quilts! Our son and his family have a newly renovated kitchen with a neutral gray palette and an idea was hatched. With the first four sessions done I had four 12" blocks with which to work.  These mats finish at 16" X 19". The pattern that I came up with is included below. I loaded them all onto one backing and batting and quilted them all at the same time using Keryn Emmerson's "Double Plume" pantograph-- quick and easy!
I'll bet if you searched you might have a quilt block or two that you could press into table service. There will be more placemats coming as this year progresses, maybe even a table runner to match!

Placemats from Quilt Blocks
These placemats were made from 12.5” (unfinished) quilt blocks.
Finished mats measure 16” X 19”

For each placemat, from border fabric:
Cut 2 pcs. 12.5” X 3.5”
Cut 2 pcs. 19.5” X 1.75”
From accent color fabric (also used for binding):
Cut 2 pcs. 12.5” X 1”
Cut 2 pcs. 19. 5” X 1”

I attached the narrow, accent color fabric to the border fabric first, using ¼” seam and then attaching these units to each quilt block; sides first, then top and bottom with ¼” seams.
Quilt as desired (that phrase always makes me laugh!). Square up mats.
Bind* with accent color.

* I used Quilter’s Dream Poly batting for these and cut my binding strips at 2.25”.

Enjoy!

Life is Good!


30 March, 2019

Facets

Facets ~ 55" X 55"
Currently this is a nine block quilt top, the results (so far) of this year's BOM at my LQS. I am still deciding, but this may be as far as I go with this one, I like the symmetry of the setting as a square quilt. This has been a stretch for me as I chose to stay in a monochrome state of mind, but varying the low volume backgrounds has added enough interest for me to keep things interesting. These blocks are all based on traditional patterns constructed using Deb Tucker's Studio 180 tools and technique sheets, I designed the setting based on her Split Rects tool. 

Life is Good!

02 January, 2018

And The Hex Continues...

It's cold outside; too cold to do anything but stay indoors, and as long as I'm inside I might as well be sewing-- right? It's a new year but I am still under the hex; I've completed the latest hexagon block (okay, I did five!) for our block-of-the-month classes at my LQS. My newest blocks are all on the top row of this photo. This month we were to make 3-grid blocks. These end up being 6.5" (unfinished); in order to have them play nicely with all of the other 8.5" blocks (again, unfinished) they are banded all around with a one inch strip. I love the complexity that they add to the mix in all their faceted loveliness. We are using two indispensable tools for these blocks: the Hex N More and the Sidekick by Jaybird Quilts. I'm telling you, without a doubt, you can't go wrong with these rulers. This is month number nine, I can't wait to see what's next. I am using scraps for these and have no idea yet how they will be set. But then, with these blocks arrayed just so for now, why would I think too far ahead? What's on your design wall this year?
Life is Good!

30 November, 2017

Sew HEXciting!

Sewing hexagons is much like eating potato chips-- I simply can't stop!
How will they eventually be set together? What will I use for a background? Time will tell. 
I am enjoying the process too much to worry about that just yet.
Life is Good!

28 November, 2017

Playing With Pieces

These are 4" sub-units created in two sessions of Tucker University at my LQS. I absolutely love Deb Tucker's Studio 180 Design tools (they're not rulers, they're not made for measuring). I have quite a collection of them, having acquired them over the years. These sub-units are the result of using the Tucker Trimmer and the V-Block Trimmer. Here you see stacks of Half Square Triangle blocks, Shaded 4-patch blocks, Combination blocks, Quarter Square Triangle blocks, V blocks, Sidekick blocks and Hi-low blocks. They are all precisely trimmed to 4.5"and will finish to 4"; they can all be combined with each other interchangeably to create innumerable combinations for larger block layouts as shown below. Tomorrow I will attend the third session of Tucker University where we will use the Wing Clipper tool to make Flying Geese sub-units and variations, these will soon be added to the mix; I can't wait! Yesterday afternoon I played with the stacks shown to imagine just a few of the pretty  12" blocks that might be in my future; as you can see, missing in all of them is a center square-- I am dreaming up all kinds of exciting possibilities there! How much fun are you having in your sewing room these days?
Life is Good!

06 October, 2017

Just In Case

 As a participant in this year's "Let's Get Organized" club at my LQS I have been busy keeping up (or attempting to!) with each month's project featuring patterns By Annie. All of the patterns are inspiring and the instructions straight-forward and simple to follow. 2017 will go down in history as the year that I have conquered my fear of zippers. I made this foldover carry-all for Mason. He can carry all sorts of treasures with him: a tablet and pencil, paper back book, whatever he chooses. There is a hidden magnetic catch that holds the case neatly closed.
This is made using the "Just In Case" pattern in the large size, 8" X 10.5". It opens up to reveal two zippered compartments; one mesh and one see-through heavyweight vinyl. The mesh pocket expands and will conform nicely to accommodate almost anything that Mason chooses to stuff in there. I will definitely be making more of these.
These photos are from the website. Couldn't you think of a thousand uses for one of these?

I will give Mason his tomorrow. We will be traveling to the Capital City to watch him play soccer in the morning and celebrate Lucy Ann's seventh birthday belatedly. Seven?!? How did that happen? As always, time is fleeting-- where did summer go anyway? I don't feel as though I even had a chance to say good-bye. I need to replace the withering annuals in the pots on the front porch with some fall color today. Did I say withering? That's not exactly accurate; decimated is more like it. I caught this guy blatantly devouring what was left of the potted Impatiens on the front steps earlier this week. Seriously; if he had been any closer to the front door he could have rung the doorbell!
I don't believe that he and his friends have a taste for Chrysanthemums.  At least I hope not. 
Life is Good!