Showing posts with label quilt labels. Show all posts
08 August, 2020
Label It!
"Brother Bear" is quilted, off the rails and trimmed for finishing. My normal order of doing things, once quilting is completed, is to print out a label and make the hanging sleeve and binding; then I place the hanging sleeve and label into position and attach them at the same time that I stitch the binding on. This was the last sheet of Printed Treasures that I have on hand. I realized a few months ago that this product is no longer available, every website that I checked was out of stock and my LQS is unable to order it. I have used it for label making for many years. (I did find a lone package floating around on an E-bay site for an exorbitant price, no thanks!) I am currently researching a substitute product and, so far, have almost settled on EQ Printables. I have also found a very similar June Tailor product, I just don't know. I haven't purchased any yet and am eager to get the opinion of other quilters out there. Do you print your labels from your home printer? What do you use for your labels and how easy is the product to work with? How well does the printing hold up after washing? Please weigh in and help me out, the sheets are pricey and I don't want to make an expensive mistake. Thanks SEW much!
18 September, 2019
Home Again, Home Again
I'm back! You may not have noticed the absence, I have been slow to post lately and got too busy to load any posts ahead of time before being in New England for the last week and a half. As you can see, I was lucky enough to visit Keepsake Quilting in Center Harbor, NH on Saturday last week, it was a rainy day and where better to spend time? And, yes, I found some goodies! 😁
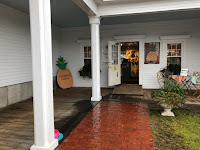
Right around the corner of the porch on which I am standing is the site of the new Pineapple Fabrics store. It is featured as one of the top ten quilt shops in the current BH&G Quilt Sampler magazine; it does not disappoint, either! This space is filled with precuts; colorful displays, a wonderful room in which to relax (for quilter's spouses or those waiting on shoppers) equipped with a television, comfy chairs and complimentary beverages-- take a peek at the one minute video hyper-linked above-- you'll see!

A quick stop for Cider Bellies, donuts freshly made and hot out of the fryer, at a farm stand on the way to Keepsake made for a perfect day's outing! These may have been consumed in the car before even leaving the parking lot! Ah, fall in New England-- I wish you could have smelled this place, the donuts are positively irresistible!
Time spent in New England was precious family time. I carried a stack of quilt labels to document my Mother's quilts for her. Last time I visited we photographed and jotted pertinent data for each one.
This trip I sat and added the labels to the backs of each one. Don't ever neglect to document your quilts and include your quilt's name, your name, the year and where you were living when you made it; that's pretty much the bare minimum of what should goes on your label; naturally, if you can add more information it doesn't hurt (pattern name and/or source, quilter's name if different than piecer, etc.); you may think that you'll always remember and a label isn't necessary. Believe me, it really, truly is!!
My sister gave me this precious antique child's iron and ironing board during the visit. I still can't believe it; it reminds me so much of the ironing board that I had when I was three years old. I love it!
There's more to share and I know that I need to get back to the "little houses" teaser from the last post. I will, I promise. In the meantime: the pattern winner from that same post is Pat, she will be receiving a Lemoyne Trails pattern in the mail in the next few days; thanks to all of you for playing along! For the rest of the day I will be finishing laundry and settling back in. Dorothy knew best, even though it's wonderful to travel there really is no place like home!
Life is Good!
30 June, 2019
Document Those Quilts!
This is the second in a series of things that we all know that we're supposed to do when making quilts but are overlooked a good deal of the time. The previous post covered prewashing fabrics that might bleed before they're used in our quilts, thus avoiding catastrophe. Today's post is about documenting your quilts. You know how glorious that feeling of pride and accomplishment is when you take that final stitch in a completed quilt? You want to revel in the moment and you think you'll add the label and vital information later. Later has a way of never coming. My Mom asked me if I would help her to document her quilts while I visited earlier this month. We rounded them all up; I found eleven without labels. Believe me, it's much easier to remember given quilt names when it's in the front of your mind, not years later! We persevered. Mom supplied the best information that she could and I took it all down, photographing each one as we went. Remember, adding labels isn't for you, (although it might be handy to check on the information for yourself), but all the data on the label is really for discovery by the next generation or recipients of your quilts; it can be as extensive or as brief as the quiltmaker chooses. 
So, what exactly should go on a quilt label? Bare minimum of facts to be included are the quiltmaker's name, his or her geographical location at the time the quilt was made and the year.
My own labels include the quilt's name, my name, my location, the year (often the year begun and the year completed, they're not often the same year!), any pertinent pattern designer information if that applies and the name of the quilter if that varies from myself. Typically I design my labels on my laptop and print them out onto a paper-backed photo-transfer fabric sheets*. You could also embroider your labels or write them by hand with a permanent fabric pen onto a piece of stabilized fabric. Once it's completed I attach it to the bottom corner of the quilt back, incorporating it into the binding at that corner.
Believe me-- adding your labels as you finish your quilts is one less worry that you'll have later when you're trying to remember "when did I make this?", "did it have a name?", "what was the pattern source?"!! Time's wasting; go forth and document your quilts! You're welcome. I will be working on a dozen labels or so in the next few weeks, wouldn't you like to join me?
Life is Good!
*I have always used Dritz Printed Treasures for this process in the past but find them harder and harder to find, and when I do they're much more expensive; I may switch to EQ printable sheets in the future, they do get good reviews.
19 August, 2014
Who Moved The Finish Line?
How many times have you heard (or said) "the quilting's done, all I need to do is bind it." For me, I always have to remind myself that having the quilting done is simply one more step toward finishing... you'd think that I would know enough to understand that the finish line is still some distance away, but I continue to be delusional, even after all these years! After quilting come the following six steps, and they're all important:
1. trimming/squaring up the quilt
2. cutting/joining the binding strips (and making piping, as I did in the case of this quilt, Swiss Baskets, as shown)
3. making the hanging sleeve (I always make a sleeve, even if it's to be used as a bed quilt; we have no idea how our quilts might be used/displayed in the future. I make the sleeve almost invisible by constructing it from leftover backing fabric) and attaching that to the top of the quilt before adding binding
4. creating the label (be sure to add pertinent information, such as the quilt's name, the recipient's name and occasion if that applies; your name, location and the date completed
5. applying the binding by machine
6. hand stitching the binding into place (and the bottom/sides of the sleeve)
| This handkerchief was a gift from Quiltkeemosabe and will become this quilt's label, it fits the theme perfectly! I plan to add all of the information to it (as mentioned above) with my embroidery machine. So, the next time you think (along with me) "who moved the finish line?" keep in mind that every step toward finishing gives all your hard work up to this point (the planning, the shopping, the piecing/applique and, finally, the quilting) even more value. You'll be even happier with your final result if you check off each step as you go from the "finishing list", I know that I always am; and then, at long last, that elusive finish line comes into view and becomes a very welcome sight!
Life is Good!
|
17 July, 2014
This and That Thursday
I'm picking up where I left off yesterday on the subject of basting down the binding and including the quilt label as another step in the finishing process. My quilts aren't really done until they're labeled! I design my labels on the computer and print them directly onto Printed Treasures fabric sheets that I run through my printer. I heat-set the label with an iron and cut it to fit before I bind the upper and left sides of the label (to match the quilt's binding) before tucking the label under the existing binding on the quilt, in the lower right corner; finally, I baste that down into postion so that the entire process of whipping down the binding, and the label, can be done at the same time. This "framed up" label is a neat last step; be sure and include the quilt's name, your name, where you live and the date; I use the date when I finish the project!
Speaking of cookies... the grandchildren visited over the weekend and I baked M&M cookies; digging out a recipe that I hadn't used for years. The little ones loved them, naturally, and so did Mr. Goodneedle! He got his own batch after the weekend was over, he didn't have to share any of these! When was the last time you baked up a batch of FUN?
The Corn Hole boards have been completed for Mason's upcoming birthday. Once again, something beautifully crafted from the workshop; Mr. Goodneedle earned those cookies!
Do you have a button box? I have a button tin (foreground) it is ten inches in diameter and four inches deep... it holds all of these buttons, barely! It is a great resource when I need a button, as I did for the back of my khaki pants the other day. I couldn't find one that matched the one on the other side, so I needed to find a pair that would work. Any search through the button box takes time... there are so many treasures contained and I have a tendancy to become distracted by the contents. Originally I inherited my grandmother's button basket, her mother-of-pearl and antique shell buttons are a part of this collection; when I outgrew that basket all the buttons came to live together in this one place... novelty buttons, pewter buttons, ceramic buttons, hand painted buttons and so on. It's never too late to start a collection of your own if you don't have one; you'll find countless, handy uses for your buttons, but don't say you haven't been warned about how much time you'll spend poring over them.
I loaded Swiss Baskets on Snowbird and started quilting, I am enjoying this one already!
Life is Good! |
Subscribe to:
Posts (Atom)


