Showing posts with label specialty rulers. Show all posts

10 June, 2018

Sew Berry Sweet

I had amassed a nice collection of various hexagons following our last block-of-the-month series. I knew how I wanted to set them together, and yet, they languished on the design wall. I had a stretch of a few days last week with nothing else on the calendar and began the process. I was excited about the prospects of this becoming a flimsy. 
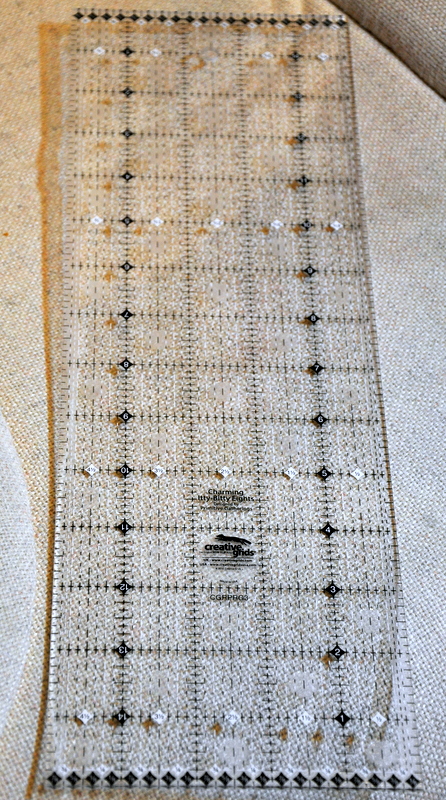
Row by row I worked, since each block had been cut precisely using the Hex n More and the Sidekick rulers they fit together perfectly. I was on a roll. All of a sudden my roll was slowed; no, stalled... no, stopped altogether! This was my roadblock:
Where every other block measured 8.5", unfinished, this one measured a full 9"! What? How did this happen? I considered leaving it out and substituting another block. No, I loved this one just too much! I was stymied, where did I go wrong? I was left with no alternative but to take it apart, each segment of eight pieces each, and try to pinpoint my error. It didn't take long. 
My seam ripper got a workout. My Mom had gifted me with this a couple of months ago, a Clover retractable seam ripper.  She was cleaning out her sewing room and I became the lucky beneficiary of some really excellent notions. This little seam ripper worked extremely well, I highly recommend it, it fits nicely in the hand and has a sharp blade and won't poke when stashed in my portable sewing kit. Score!

So, here was the problem. I had completed each of the six triangle units but had failed to trim them down to size before assembling them into the block! Groan. I had been in too much of a hurry. See that little pile of trimmings above... something so small and seemingly insignificant was standing in my way! Once I got the problem identified and rectified it was full steam ahead! So, lesson learned. I know better.
One more product recommendation: (also a gift from my Mom) the Gypsy Pin Pal. It is adjustable to fit any wrist, it contains magnets and hold pins securely as I remove them when I stitch. This saves me numerous trips back and forth to my pin cushions or, even better, from retrieving dropped pins off the floor around the sewing chair. I love this clever invention. (I only recommend what works for me and am not promoting or receiving compensation!) If you are like me and have piles of pins placed on the flat surface around your sewing area after every row that's sewn you might want to look into this notion. It has not only made my life easier but my sewing space tidier-- win, win!
Speaking of the sewing chair-- look who waits for me between each trip to the ironing board as I attached the rows. My furry little companion. I sit on the front part of the chair, there's room for both of us!
"Sew Berry Sweet" ~ 76" X 76"
And finally, at long last, a flimsy. I had two yards of Cherrywood in a dark navy blue for the six inch outer borders all around to complete. Once I got that strawberry block fixed it was smooth sailing the rest of the way. I won't ever look at this quilt again without remembering. That pretty little strawberry block makes this almost-finish that much sweeter now, and contributed to this beauty's name!
Life is Good!

16 November, 2016

Give Me Liberty!

This is the Liberty Lemoyne block; a strip pieced star that is the ninth block in my LQS' block-of-the-month program this year; all of the blocks this time are Lemoyne variations using Deb Tucker's Rapid Fire Lemoyne Star tool. I am in love with this one (both the block and the tool)!  Last week I added a new toy to my ruler collection. I already have one of the Itty-Bitty Eights ruler (6" square) which makes cutting small increments SEW much easier; so, adding this longer strip ruler, marked the same way, was a no-brainer for me. 
This one measures 5" X 15", it's a very handy size to begin with, but the 1/8" markings are clear and easy to read. As with all Creative Grids rulers, this one has the non-slip surface on the back which makes rotary cutting very skinny strips a breeze, it does not move at all when cutting; this ruler has earned its space already in my ruler drawer and I have only used it for this one block so far! The so-called intended purpose of this one is for cutting charms; however, check out its versatility here. I sliced the called-for 1 5/8" strips for Liberty fearlessly using this Charming Itty-Bitty Eights. Take a good look at this one the next time you're in the ruler section of your favorite quilt shop, you'll want one too. As quilters we're only as good as our tools, right?😉

Life is Good!

On this, the sixteenth day of November, I am grateful
for all of the brilliant ruler designers who anticipate
our quilting needs and make our work look so good!

28 May, 2016

Diamond Distraction

Does anything like this ever happen to you? I  saw a quilt that was shown in our guild's biennial show last weekend and I became obsessed with the pattern. I quickly contacted Quiltkeemosabe to see if she knew the name of the pattern; or, better yet, if she had the pattern. She didn't but she casually said: "if we had some 60 degree graph paper I guess we could figure it out". Okay, I took that as a personal challenge, I knew I couldn't rest until this block was constructed. Not knowing exactly how to proceed after I had drawn it up, I quickly discovered my "Sidekick"* ruler, otherwise unused up until now. Score! Not having any particular size in mind I decided to make the star center scrappy, cutting 2.5" diamonds easily and efficiently with my new-found favorite tool! I also had a bin of 2.5" precut strips. Score again!! This same ruler also allowed the background setting diamonds to be cut from 4.5" inch strips.
A friend once told me that whenever she made up any "trial" block she did them in the same color palette so that, eventually, she would have a collection of sampler blocks that would all go together. My red and white block bin is already burgeoning, but that's another post for another time.  
Half a block done! This was fun and went together perfectly. Oh, I forgot to mention that the quilt that inspired this obsession did win a ribbon at the show for "Best Piecing"; I wasn't going to settle for anything less than perfect points and intersections in my version either. 
Whew! Done. I couldn't be happier. This completed block measures 19" from west to east points, unfinished. Yes! I can rest now. I am adding this quilt to my "must do" list somewhere down the line. Don't forget: I already have all those precut strips! I'm thinking about a scrappy, multicolor quilt with a neutral background batik (one more thing just patiently waiting on the shelf to be used). But, for today, this block is joining all the other red and white additions to my someday sampler in its designated block box. If you are like me, and become distracted and/or obsessed by one thing that requires dropping all else until you can figure it out, I highly recommend succumbing to the challenge, you'll sleep better. Now, to get back on track!
Life is Good!
* For the record: Quiltkeemosabe told me that I needed that Sidekick ruler a few years ago, 
she always knows exactly what I need before I do. I am so glad that, this time, I listened!

03 January, 2016

Year End Wrap-Up

This is it, my 2015 year-end-wrap-up, three days late. I had to show my latest addition to the stash closet, the third and final ruler board. Mr. Goodneedle made it for me for Christmas. It joins these two, already installed.
This third one is the final one only because I'm out of real estate on the walls in the closet! My husband would like to think it's because I am done buying specialty rulers; well, if the truth were known, that is probably something that I should think about doing... but, until then, there's still room for a few more! The rest of this post is a show and tell of random dowloaded photos that, basically, speak for themselves but I'll add a few brief explanations.
After the Christmas pillowcases came off the grandchildren's pillows 
they had to be replaced... out with the Santas and reindeer and in with some winter fun motifs!
I ordered this book which arrived too late to have some sewing fun with the little ones this year...
bit that's okay, we'll start early this year and create some ornaments together, this is an adorable resource; I recommend it.
I am wearing this pin proudly, the precious gift from a dear friend who knows me well...
proclaiming me to be the queen of ironing; I can own that!
This is another Christmas gift, from my husband. Too bad it wasn't cool enough to wear it at the time! 
Notice the temperature on the instrument panel of my daughter's car. This was on Christmas eve at 5 PM! Actually, the temperature rose to an unbelievable 80 degrees before we arrived at church that evening! I was reminded by those temperatures and the humidity level of a Christmas eve twenty years earlier... when we lived in Puerto Rico! North Carolina, Christmas 2015, felt exactly like the Carribbean. 
 
I stitched out some samples this week for altar linens, something new to me; I loved the results.
That's it: a wrap-up of randomness. All in all it's been a good year... and on we go, it's all good.
Welcome 2016 ~ I'm ready!
Life is Good!

21 July, 2015

New Tools = Happy Quilter!

I'm all set for tomorrow's Bible Study at Quiltkeemosabe's home. Ten more blocks done this past month, we're 43.5% done (88 out of 202 blocks).  Working out of Rosemary Young's Quilt Block Bible has been lots of fun as well as challenging when it comes to writing up all of the piecing instructions. I've put some great tools to work this time: Studio 180 Designs Corner Beam and Corner Pop tools have proven invaluable in working out the blocks in chapter two, Pinwheels and Windmills, shown in the photo at left, the bottom four blocks. I'm glad I happened to have them in my tool arsenal, as well as the E-Z Tri Tool. I have added Marsha McCloskey's Feathered Star Ruler to my bag of tricks, Quiltkeemosabe had recommended it to me and boy, am I ever glad that she did! It is a ruler marked for precision cutting 1/8ths and 1/16ths. I now find that I can tackle these impossibly small-seeming cut sizes without fear! I am still loving Creative Grids Itty-Bitty Eights ruler, but this new one (to me) opens up yet another way when it comes to precise 1/16" cuts. YAY!! All of these blocks shown are 6", finished, to give you some perspective.  So here's the deal: I'm certainly not suggesting that you go out and buy all of the rulers that I have referenced here. What I am thinking, though, is that you may have some of these rulers in your sewing room, they may even be collecting dust; get them out. Dust them off. Familiarize yourself with them and their capabilities. These are precision tools; they're designed by really smart people who've already done all of the hard math for you. Use them! The results will show up in your piecing. It's a definite win-win.
Panning out from the tight shot, above, you'll see what's growing from the bottom up on my design wall. It's the tumbler challenge thrown out earlier this month as a Leader-Ender project by Bonnie Hunter. I'm calling mine, a charm quilt, TMX2 (The More The Merrier). It's totally mindless piecing which, sometimes, is oh-sew-necessary after precision sewing for accuracy.  Whatever you're piecing in your sewing room, I hope you're having fun... remember, after all, why we do what we do; this is (or should be) our happy place!
Life is Good!

18 June, 2015

Stitch Which?

So,  while working my way through Rosemary Youngs' Quilt Block Bible I came to #37, Whirlpool. The way the book works is that there is a photograph of the completed, stitched block and the ability to print out a block diagram sheet from the CD (it comes with the book). Hmmm... I couldn't make out any reason for the arrangement as photographed, to me it appeared cluttered and was lacking in organization; it didn't make sense. I printed out three of the diagram sheets and grabbed some colored pencils, surely I could come up with a balanced arrangement that would be more pleasing to the eye. If I was going to stitch sixteen tiny half-square triangle units they were going to have contrast and not combine into square blocks of color... why bother?
These block representations appealed more to me. I settled on the one shown on the far right, deciding that the open center depicted the center of a whirlpool with enough movement surrounding the center to be visually pleasing. Creating the mock ups was a fun exercise without wasting fabric.
I like it! 
For perspective: there are 32 triangles in this block, the half-square triangle units finish to 1.5", combining to create a six inch block. I am loving that Itty Bitty Eights ruler more and more every day!
Life is Good!


20 May, 2015

Positivity Is Spreading...

"Think Positive!"  ~  45" X 55"
Almost a year ago I posted about a quilt that I had designed in EQ7. I made up a few blocks and put it away; the project... but not the idea! You can access the block pattern by clicking on the link above.


I pulled it all out again this past Monday and began getting all my "pluses" into rows. I love the look of this... it's cheerful and positive! The cute little blocks measure only five inches square and I have put that Creative Grids Itty-Bitty Eights ruler to good use squaring them up. This new ruler is quickly becoming indispensable to me. I absolutely love the eighth inch markings as well as the non-slip finish, I honestly don't know how I got along without it before. I'm not quite half done with this small quilt, stay tuned for more... it's NOT being reshelved before it's a full-fledged flimsy! Part of the fun with this one is using up some of those accumulated low volume background prints... it was high time to cut into them! Don't worry about my stash becoming depleted, I've hardly made a dent. If you like making blocks on the small side you definitely should check out the ruler... but I'm warning you, making itty-bitties can become addictive!
See what I mean?  
These 2" Cake Stand blocks are piling up; a tiny bit at a time.
They don't take up much space or use up much fabric either;
I'm challenging myself to use up even the smallest of scraps.
Life is Good!

30 April, 2015

A LITTLE Diversion

I've been hearing rave reviews for a ruler that I don't have. Quiltkeemosabe mentioned the Itty Bitty Eights ruler by Creative Grids, she thought that it might come in handy for our future Bible Study blocks. I usually try to avoid eighths of an inch when it comes to cutting out quilt blocks. I will go to great lengths to overcut and then trim down for accuracy. Yesterday I ran across an online pattern for this two inch Cakestand block. Using my scrap boxes of 1.5" and 2" cut squares I fished out a few and decided to take a closer look at the Itty Bitty Eights ruler and put it to the test. It worked perfectly! I cannot believe that I stitched the first block with such precision. To prove it wasn't a fluke I sat right down and stitched up two more. This has been a completely enjoyable LITTLE diversion after working on those high school graduation quilts with great BIG plain, solid blocks. What am I going to do with these micro quilt blocks?  I don't have any idea. It's just nice to know that I can do this. Of course, I immediately e-mailed a picture of completed itty-bitty block #1 to Quiltkeemosabe. As of this afternoon it looks like we may be headed down this rabbit hole together; one more adventure is underway, and it all began so innocently.
*wink*
Life is Good!

26 March, 2014

Fun And Done!

The Batting Buddy is a  two-piece "template" that nests within its outer frame.
Last week a friend asked me about the "Batting Buddy" ruler when she saw it hanging on the ruler board. It's been awhile since it saw any action and I was happy to get it down and show her how it works. In fact, I decided I could best demonstrate it to her by creating something and you know how that goes... one thing leads to another... and my Batting Buddy leapt out of retirement and onto center stage! I blogged about this back in 2009 when I created a quilt for children; it has been much loved and well used since then.
The center piece of the template is for cutting batting scraps... I have a ton of those!
The outer frame portion is for cutting out the backing pieces. Once the backs are cut the batting piece is placed within the "window" opening and the outer frame template is carefully lifted off. An even margin of backing fabric remains exposed on all four sides.
Scraps and strips are positioned over the batting, and stitched down through all three layers using a "flip and sew" technique until the central batting square is covered with fabric pieces. I happened to angle my pieces acroos the corners but straight sets or even crazy-patch would work just fine. If you click on the "Batting Buddy" link above you can find some beautiful patterns utilizing this tool, for the quilting purists out there, mine is a much more impromptu "stitch up what you've got" method.
The covered piece should look like this, with the added fabric edges irregular and protruding.
Flip the unit over and carefully peel the backing fabric up and away from the batting edge, fold the backing onto itself, this folded edge, of backing fabric only, should be well protected under a ruler before trimming.
Position the ruler exactly along the exposed edge of the batting taking precautions to have the folded backing fabric completely under the ruler and below your cutting line. Believe me, you don't want that blade edge to come in contact with the folded edge of the backing fabric! Trim away the excess fabric strips right along the batting edge, rotate the block and continue this method on all four sides.
Your trimmed block should look like this.
If you choose to join your blocks (I'm constructing a table runner) you will align them WRONG SIDES TOGETHER pinning precisely along the batting edge (check top and bottom to ensure that both blocks are aligned) and stitching right along that same edge, removing the pins as you go. Stitch from the top of backing to bottom of backing using that same line. (I drew a pencil line as a guide on the backing fabric.) 
Turn the raw edges under on the front side. I folded mine in so that the raw edge met the seam line and pressed in the fold. I used a few drops of school glue under the fold and pressed with a hot dry iron to hold the fold in place until I top stitch these joins. I like to use a decorative stitch at this point and have been experimenting with some of the triple stitches built into my machine but any securing stitch will be fine. Join all of the blocks in this manner until several rows are complete. The long rows will be joined in exactly the same manner; wrong sides together, pin to align, turn back the raw edges on the front, and secure. The beauty of this is that once your creation is all joined the edges are finished by this same method and you're done... quilting and all! Just like the template says: "Fun and Done!" Now, who doesn't love that?
These blocks can also be finished individually! In this pot holder I replaced the batting with two layers of Insul Brite and added a hanging loop. This would be perfect for gift giving at any time.
Or, how about a mug (and cookie) rug?

I was born and raised in New England where the old Yankee adage: "Use it up, wear it out, make it do, or do without" was often heard. Dusting off the Batting Buddy was just what I needed to do as a way to move out the scraps from my latest low volume quilt projects as well as reduce my batting scrap mountain!
 "Why?" You may ask. "Here's why:


The low volume bin is filling up again with new and exciting pieces that I'm just itchin' to stitch.
And, naturally, there will be leftovers that move to the scrap bin... and sew it goes... all over again!
Life is Good!