Showing posts with label EQ7. Show all posts

07 February, 2018

Clamshells For Days

Dixie 107.5" X 107.5"
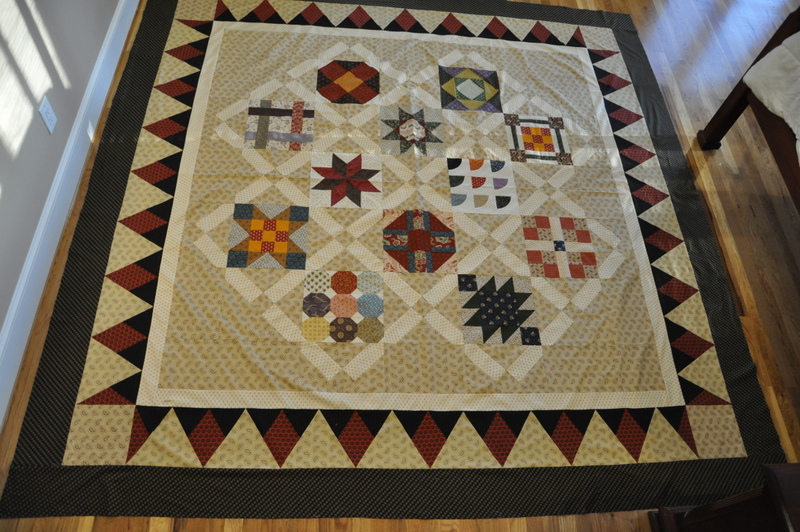
This is Dixie; I finally got the outer borders on this one, she's been hanging in the "to be quilted" queue for a long time. I knew that I needed to add the borders before quilting so that she would fit our king-sized bed. She is one big quilt!  I wasn't in any rush after the first of the year as the house was in chaos with the floor refinishing. When order had been reinstated around here it was finally time. The borders went on and the only place large enough to get a photo of the whole top was on the floor of our bedroom. This top was an eight year old block-of-the -month that I designed this setting for, with the help of EQ7, back in 2011. How to quilt her? I decided to use a new pantograph that I had purchased: "Improved Clamshell", it worked out really well. Originally I had thought about custom quilting her, but I knew that the time involved to complete that would be too much; after all, this one had been hanging around long enough.
 Dixie was loaded on Snowbird,  Clamshell quilting commenced. 
 I quilted day and night. I saw Clamshells in my sleep.
 Yesterday, finally, she was all quilted! She is trimmed and awaiting binding now. 
I plan to make coordinating pillow shams soon, but for now I just love how she looks on the bed!

Yep, Clamshells for days.
Life is Good!

03 July, 2015

On The Plus Side

"Think Positive!" ~ 46" X 56"


Some things are worth the wait, this flimsy is no exception! I began this small quilt over a year ago. Somewhere along the line I got distracted... who, me?... and simply didn't get back to this until a few weeks ago. With a dedicated spirit I worked on it a few hours every day and finally got the borders on it yesterday. I designed this quilt in EQ7 and posted about it late last May, shortly after that I was contacted by them for permission to include this pattern in their "Do You EQ?" blog, I was flattered. At the time I was looking for a way to showcase my vast collection of low volume prints and this scrappy idea fit the bill. Since then my collection has only grown; but, on the plus side, this one is now a full-fledged flimsy! You can access the pattern here. It's easy, and fun! 
Life is Good!

20 May, 2015

Positivity Is Spreading...

"Think Positive!"  ~  45" X 55"
Almost a year ago I posted about a quilt that I had designed in EQ7. I made up a few blocks and put it away; the project... but not the idea! You can access the block pattern by clicking on the link above.


I pulled it all out again this past Monday and began getting all my "pluses" into rows. I love the look of this... it's cheerful and positive! The cute little blocks measure only five inches square and I have put that Creative Grids Itty-Bitty Eights ruler to good use squaring them up. This new ruler is quickly becoming indispensable to me. I absolutely love the eighth inch markings as well as the non-slip finish, I honestly don't know how I got along without it before. I'm not quite half done with this small quilt, stay tuned for more... it's NOT being reshelved before it's a full-fledged flimsy! Part of the fun with this one is using up some of those accumulated low volume background prints... it was high time to cut into them! Don't worry about my stash becoming depleted, I've hardly made a dent. If you like making blocks on the small side you definitely should check out the ruler... but I'm warning you, making itty-bitties can become addictive!
See what I mean?  
These 2" Cake Stand blocks are piling up; a tiny bit at a time.
They don't take up much space or use up much fabric either;
I'm challenging myself to use up even the smallest of scraps.
Life is Good!

30 January, 2015

Squaring The Circle

"Squaring The Circle" ~ 74" X 74"

I was pretty excited when I designed this setting for a group of blocks-of-the-month in EQ7 last summer; I wasn't sure, though, that I could do it. Today I am thrilled to bits to have the top all pieced and the borders in place. I cannot wait to get this one loaded on Snowbird and commence with the quilting! My two year old granddaughter can often be heard saying "I did it"; I can appreciate and relate to that feeling of accomplishment this morning.
 I I decided to name this one "Squaring The Circle" based on a phrase; defined as follows: Try to do the impossible, as in Getting that bill through the legislature is the same as trying to square the circle. 
This idiom alludes to the impossibility of turning a circle into a square. John Donne may have been the first to use it ( Sermons, 1624): "Go not thou about to square either circle (God or thyself)."
It seemed to fit... like a square peg into a round hole.
Life is Good!

17 September, 2014

Curves!

"Adding Curves" ~  to finish up at 74" square.

I've begun the border sections on his quilt and find the piecing process of slowly stitching around the gentle curves oddly relaxing! I've already admitted in my previous post that I love to challenge myself; that's the truth. The alternate Orange Peel setting blocks weren't too bad, as long as I took my time and was careful to watch out for any slack that might result in any volunteer pleats in fabric! But, in all honesty, I was dreading these double-petaled border sections that I had designed for myself, especially adding the "V" section to the unit. Much to my delight, I found that it wasn't too difficult after all! One thing that I have learned, though, (after doing the first two) is to overcut the outer edge of that "V" (in width) so that it can then be cleanly trimmed up at 1/4" beyond the petal points. The templates I've created are exact and, even though I paid close attention to cutting those outer edges on the straight grain so that there would be no "pull" lengthwise, there is still a bit of stress to that edge pulling up from the center as this piece is set in against the curves on either side. I have remedied that occurrence by cutting these pieces a wee bit more generously (in width only, and marking on the back side where the 1/4" would fall) along that edge to allow for clean up when the block unit is complete.  

I still haven't settled on the final placement of the pieced blocks, there has been much shuffling. I can use some help here if anyone would like to weigh in and suggest a possible block shift or rotation; I believe I'm at the point where I have gone block-blind on this one!

Life is Good!

01 July, 2014

You Saw It Here First!

Think Positive!


This is very cool; the humble little project that I blogged about back in May is featured in this month's EQ newsletter,  I am very excited to be included! That's the power of positive thinking.  

Do you EQ?
 Life is Good!

26 May, 2014

On The Plus Side

Think Positive!... in the early stages of construction
So, these little five inch blocks are like eating potato chips... you can't stop at one... I dare you! I have decided these will be better to put together when joined into one ten inch block composed of units of four... quadrupling the fun! Now that I have a good idea of how CUTE these will look when stitched up I am going to go ahead and cut out everything so that this project will be sit-down ready for stitching when I am! It's all good...
Life is Good!

25 May, 2014

Think Positive!


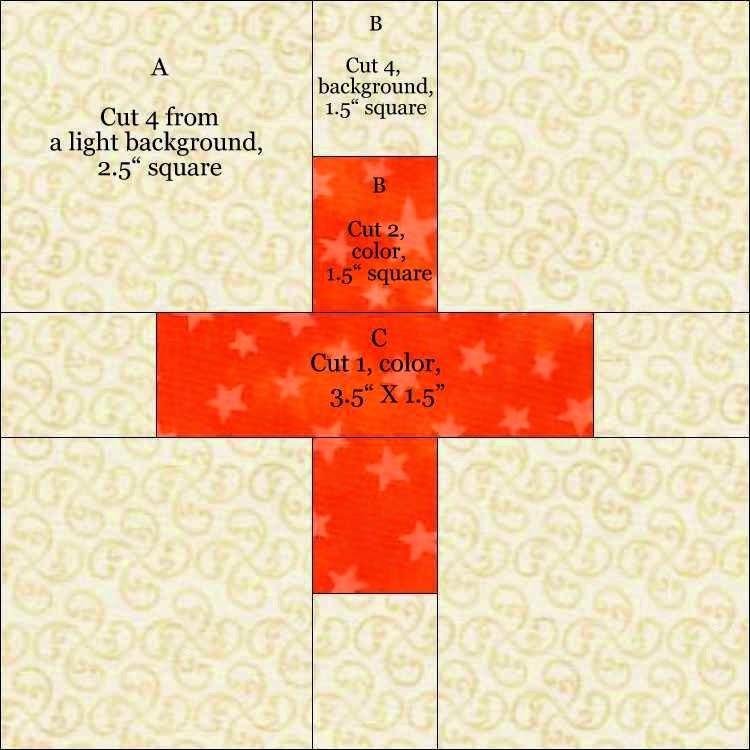
I've seen blocks that look like this around the blogs and on Pinterest boards lately, I find it very appealing.  I went ahead and designed a version of my own in EQ7, one that looks more like a plus sign and am calling mine "Think Positive!" It's an easy block, here are the rotary cutting directions for a 5" (finished) block and a diagram for a finshed quilt layout, (below) set block to block, that could be either a lap robe/throw or a baby quilt. The size could always be increased by adding sashing strips between the blocks, if desired of making the block larger. I calculated the finished dimensions for mine based on a 2.5" border on all sides.
I gathered up a stack of charm squares and some 2.5" strips in happy colors.
I will combine them with some soft, low volume background prints;
I was eager to stitch up a test block... cute!

Think Positive! ~ 45" X 55"

It's almost summer... and the livin' is easy; right? Why not take it easy and stitch up a cute little quilt for yourself or for future gift giving? You'll have this one done in no time... think positive!
Life is Good!   

28 April, 2014

Borders Galore!

Last Thursday our "Head For The Border" challenge group met to reveal their latest border additions. This last round saw the use of "square in a square" as the design element and the color purple. The results of each and every quilt are equally amazing and inspiring! For our next round we are each challenged  to add a "border made of pieced blocks" and the color orange, based on a random selection. 
Back to the drawing board! I came home from the meeting and immediately set to work in EQ7. The above plan will be my guide. I have decided to remove the last four corners blocks and replace them with four 'clover' blocks, as shown, for continuity of the center. My next border will be the black background blocks. We will have one more round after this one. "Destination: Unknown" is, at long last, offering me a hint of direction. I can't remember enjoying any journey more than I have this one; every step has been fun and exciting, watching this quilt develop has been a pure joy!

Life is Good!

24 January, 2014

I Need Your Help!

This is a follow up to my last post, the one where I admitted to being directionally challenged. Yesterday was the third meeting of our "Head For The Border" group where we enjoyed an inspirational show and tell as well as learned our next "assignment" based on the random choice of a design element and a color. The element selected from the envelope was squares. Easy enough, right? The color chosen: brown. Hmmm. Well, I decided that if I needed to add one more color I would add four; so, along with brown I am incorporating orange, blue and purple into this next round. Now, for a design plan. Squares, as is, were too boring. Squares set on point, however, intrigue me and continue the movement outward. I have placed three design possibilities up for consideration and for voting.
 Let me know what you think: #1, #2, or #3.
#1 & #3 are almost identical, except for the corner blocks. (Pretend there's purple thrown in there too).
#2 is comprised of teeny, tiny squares, that border measures 1", finished.
Thanks, in advance, for your help... and your vote!
Life is Good!

11 December, 2013

Inspiration Abounds!

Last week's "Head For The Border" meeting at my LQS was one loaded with excitement and inspiration! I posted here a few weeks ago about the rules associated with this class. The show and tell, as you can see below, was absolutely amazing. Everyone's center block was surrounded, somewhere, by rectangles and black; those were the assignments of design element and color. After each participant was through with their "reveal" our assignments for next time were drawn from two paper bags: Flying Geese and green. After that we were all dismissed, back to our respective drawing boards! I've played with my design in EQ7 and come up with this solution for our next meeting... I like the movement that is occurring  now; where will this medallion quilt go from here? It's the luck of the draw, but one thing's for sure... no two will be alike!
Life is Good!

04 March, 2013

A Centennial Quilt, Times TWO!

Bailey's Chapel Centennial Quilt 66" X 78"
I've been helping out with a special project for a local church over the last several months. They wanted a unique way to celebrate their centennial anniversary and settled on a quilt; well, actually, TWO identical quilts! One will hang in their sanctuary and one will be raffled off to support the church. You may recall seeing a photo on this blog of the growing pile of "signature" blocks as I embroidered them, there are 58 of them (per quilt!)! The church members sold these blocks as opportunities to have one's name immortalized on the quilt. They opted for machine embroidery in a consistent font/size so that it would look harmonious and the names would be visible from a distance. I worked from printed forms to ensure that the names/spellings/ dedications were exactly right.

There was a celebratory moment over the weekend when focus shifted from these signature blocks to the machine appliquéed banner sections! There are sections for five photo transfers; the church in every season in each of the four corners plus one larger, 12" square panel, in the center of the quilt a group snapshot of the membership gathered in front of the church at the Centennial Gathering last summer.

I've assisted by serving as the designer (thank you, EQ, you make me look smart!) and facilitator for this project. It won't be long now before workshops are scheduled and I can hand over the units to the church members for assembly. This has been a wonderful collaborative effort and I'm proud to have had a hand in seeing them achieve a dream, I am also very grateful to them for their patience with yours truly!

Life is Good!

08 September, 2011

Feathers Are Flying...

... in the Strawberry Patch, but I'm managing to get them stitched down! Who doesn't love this bird? My grandson does, and so does his Mama (birds of a feather)! I timed this post especially for today, my daughter-in-law's birthday, because I knew how happy this would make her! I've been planning this since he was born and spent yesterday getting all the components together for Gregory's wallhanging. I just laid the buttons in place (for the photo, above) because the white eyeballs by themselves creep me out! The button pupils will be attached later. See the quilt's layout and chosen fabrics below, I couldn't resist the pink and orange stripe: Big Bird's LEGS; I knew it had to be incorporated into the borders the moment I saw it! Big Bird's stitched "portrait" will occupy the large white square in the design, the striped fabric will combine with the blue, orange, green and red for the pinwheels.
I'm not sure that I will add the character appliqué, it has become my project muse; we'll see. My plans are to machine applique a few circles in the lower left and upper right and to attach a button-on band with Gregory's name and birthdate under the words (see layout photo) "Who Loves Big Bird?" There's nothing like seeing a plan come together, and what a happy plan this one has become.

Happy Birthday, Leigh Anna!
Life is Good!

01 September, 2011

Twinkle, Twinkle!


After drafting and refining the pattern for this little star block I began pulling scraps. I was pulling blues too, for awhile; and then one little star told me (obviously the spokesperson for the group) that they really wanted to live out their lives as a red and white quilt! OK, little star, I'm listening. There will be every shade of red and white, these little stars will, indeed, be twinkling! I've set aside an hour a day to stitch up one set, positive/negative, from two different fabrics. At that rate, with solid determination, there could be a completed center portion of this quilt top in early November... that and a cavernous dent in my stash of reds and whites. Wish me luck.
"Twinkle, Twinkle!" ~ 88" X 105"
Life is Good!

Posted by Picasa

28 August, 2011

Stumped No More

I had been stumped by the four pointed star block pictured in a previous post. I couldn't identify it, or figure out how to piece it. Yesterday, I drafted it in EQ and printed out the exploded block diagram. (Once again, EQ to the rescue!) I printed the pieces onto freezer paper, cut them apart on the solid lines and pressed them onto the wrong side of the fabric. I added 1/4" all around, marked the corners and carefully stitched the pieces back together. I did stop, needle down, and pivot to accommodate that weird set-in shape; it worked perfectly.


Voilà! Success!!
If anyone is interested in the print-out for this six inch pieced block, let me know and I will be happy to e-mail you the pattern as a full sized attachment.

Life is Good!

Posted by Picasa